
In the digital age, establishing a robust and reliable communication channel with your website visitors is paramount. A well-implemented contact form transcends a mere tool; it becomes a vital bridge, fostering stronger relationships, addressing inquiries, and directly engaging with an audience genuinely interested in your offerings. For businesses, personal brands, and content creators alike, this direct line of communication is indispensable for growth and engagement.
While WordPress, the world’s most popular content management system, offers incredible flexibility, it surprisingly doesn’t come with a built-in contact form solution right out of the box. This absence means you can’t immediately create a form to collect messages, gather feedback, or generate leads without an additional tool.
Fortunately, the vast and vibrant WordPress ecosystem shines brightly in this area. Just like with most functionalities you might wish to add to your WordPress site, there’s an impressive array of contact form plugins available. These range from feature-rich premium options to highly capable free versions, ensuring there’s a perfect solution for every need and budget.
For the purpose of this comprehensive guide, we will walk you through the process of integrating a contact form into your WordPress website using one of the most highly-regarded and user-friendly options available: WPForms Lite. This free plugin is celebrated for its intuitive design and powerful features, making it an ideal choice for beginners and seasoned webmasters alike.
By the end of this tutorial, you’ll be fully equipped to set up your contact form, enabling seamless communication with your site visitors and transforming passive browsing into active engagement.
How to Effortlessly Add a Contact Form to Your WordPress Site with WPForms Lite
A contact form is more than just an email collector; it’s a gateway for lead generation, customer support, and invaluable feedback. It allows your audience to reach out with questions, concerns, collaboration proposals, or simply to express interest. For businesses, it can be the first step in converting a visitor into a customer. For bloggers, it’s a way to connect with readers and build a community. Without an easy way for visitors to contact you, you risk losing potential opportunities and undermining trust.
Introducing WPForms Lite: Your Go-To WordPress Contact Form Solution
WPForms Lite is a leading WordPress contact form plugin that has revolutionized how website owners create and manage forms. It transforms the often-intimidating process of adding a contact form (or virtually any other type of form imaginable, from surveys to registration forms) into an incredibly straightforward and enjoyable experience. The plugin’s core philosophy centers around simplicity and power, allowing anyone to build professional-grade forms without touching a single line of code.
Key Features That Make WPForms Lite Stand Out:
- Intuitive Drag & Drop Form Builder: At the heart of WPForms Lite is its powerful drag & drop interface. This visual builder allows you to effortlessly add, remove, and rearrange form fields with just a few clicks. You can see your form taking shape in real-time, eliminating guesswork and speeding up the design process. This feature alone makes form creation accessible to users of all technical skill levels.
- Pre-built Form Templates: To get you started even faster, WPForms Lite comes with a selection of pre-designed templates. Whether you need a simple contact form, a newsletter signup form, or a suggestion form, these templates provide a solid foundation that you can customize to fit your specific needs. They save valuable time and ensure your forms look professional from the outset.
- 100% Mobile-Friendly Design: In today’s mobile-first world, ensuring your forms look and function perfectly on any device is non-negotiable. WPForms Lite automatically creates responsive forms that adapt beautifully to desktops, tablets, and smartphones, guaranteeing a seamless user experience for all your visitors.
- Optimized for SEO and Speed: A fast-loading website with well-structured content is crucial for search engine rankings. WPForms Lite is built with performance in mind, ensuring your forms add minimal overhead to your site’s loading speed. Furthermore, its clean code structure is inherently SEO-friendly, helping your site maintain good standing with search engines.
- Smart CAPTCHA and Spam Protection: Dealing with spam submissions can be a major headache. WPForms Lite includes smart CAPTCHA functionality, such as reCAPTCHA and hCAPTCHA integration, as well as a clever honeypot feature. These tools effectively deter bots and prevent spam entries without creating annoying hurdles for your genuine human visitors.
Elevate Your Forms with WPForms Pro:
While WPForms Lite provides an excellent foundation, if your needs grow more complex, you might consider investing in the Pro version. WPForms Pro unlocks a vast array of advanced features designed for businesses and websites with sophisticated requirements. These include:
- Email Service Provider Integration: Connect your forms directly with popular email marketing services like Mailchimp, AWeber, ConvertKit, and more. This is essential for building email lists and automating your marketing efforts.
- Acceptance of Multiple File Uploads: Allow users to upload documents, images, videos, and other file types directly through your forms. This is perfect for job applications, support tickets, or content submissions.
- Multi-page Form Capability: Break down long forms into multiple, digestible pages. This significantly improves user experience, reduces form abandonment, and makes complex forms less daunting.
- Payment Gateway Integration: Easily accept payments, donations, or registrations directly through your forms. WPForms Pro integrates with leading payment gateways like PayPal and Stripe, making it ideal for e-commerce or event ticketing.
- Smart Conditional Logic: Create dynamic forms that adapt to user input. Conditional logic allows you to show or hide fields, sections, or even submit buttons based on previous selections, personalizing the form experience.
- Advanced Fields and Templates: Gain access to more specialized fields like signature fields, Likert scales, and NPS surveys, along with a library of hundreds of additional pre-built templates for virtually any use case.
- Entry Management and Reporting: View, manage, and export all your form entries directly from your WordPress dashboard. Detailed reports provide insights into form performance and user behavior.
- Post Submissions: Allow users to submit blog posts or other content directly from the frontend of your website.
Now that you understand the power and flexibility of WPForms Lite, let’s dive into the practical steps of adding a contact form to your WordPress website.
Step 1: Installation and Activation of WPForms Lite
The journey to a functional contact form begins with installing and activating the WPForms Lite plugin. This process is straightforward and consistent with how you’d add any other plugin to your WordPress site.
First, log into your WordPress admin dashboard. Navigate to the left-hand sidebar and click on Plugins, then select Add New. This action will take you to the WordPress plugin repository, where you can browse and search for plugins.
In the search bar located on the top right of the “Add Plugins” page, type WPForms. You will likely see “WPForms Lite – Drag & Drop Form Builder for WordPress” appear as one of the top results. It’s important to look for the “Lite” version for our purposes, as it is the free offering.
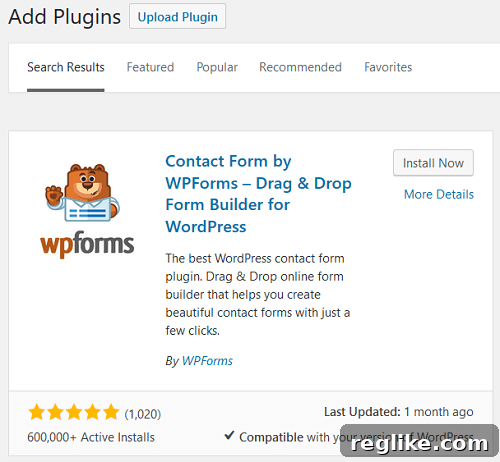
Once you’ve located WPForms Lite, click on the Install Now button. WordPress will then download and install the plugin files onto your server. After the installation is complete, the “Install Now” button will transform into an Activate button. Click on Activate to enable the plugin on your website. Activation is crucial, as the plugin will not function until this step is completed. Upon successful activation, WPForms Lite will typically present a welcome screen, guiding you to its main settings or offering the immediate option to create your first form.
Step 2: Choosing Your Form Template
Following the successful activation of WPForms Lite, you will often be greeted with a welcome message or redirected to a page that prompts you to Create Your First Form. This is your cue to begin designing your contact form.

On the subsequent screen, you’ll be presented with several types of pre-built templates. These templates are designed to cater to common form needs and provide an excellent starting point, saving you the effort of building a form from scratch. In WPForms Lite, you’ll typically find options such as:
- Blank Form: For those who prefer to build their form field by field, offering complete creative control.
- Simple Contact Form: The most popular choice, including essential fields like Name, Email, and Message.
- Newsletter Signup Form: Ideal for collecting email addresses to grow your subscriber list.
- Suggestion Form: Designed for gathering feedback or ideas from your audience.
If you were using the Pro version, you would have access to a significantly wider library of pre-designed templates tailored for various industries and specific purposes, further accelerating your form creation process. Regardless of the version, remember to select the template that most closely aligns with the purpose of your form to optimize your workflow.
Crucially, on this screen, you will also find a prominent section where you can Name Your Form. It’s a good practice to give your form a descriptive and easily recognizable name, such as “Website Contact Form,” “Customer Support Request,” or “General Inquiry Form.” This will help you identify and manage your forms efficiently, especially as you create more of them in the future.
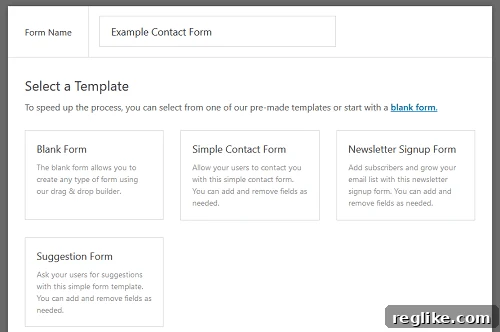
For the purpose of this demonstration, we will select the Simple Contact Form template and name our form “Example Contact Form.” This template offers a solid foundation for most general contact purposes.
Step 3: Building and Customizing Your Form
Upon selecting your template and naming your form, WPForms Lite will usher you into its intuitive drag & drop form builder interface. This is where the magic happens, allowing you to visually construct and customize your form with unparalleled ease. The main canvas will display your chosen contact form template, already populated with standard fields commonly found in such forms, like Name, Email, and Message.
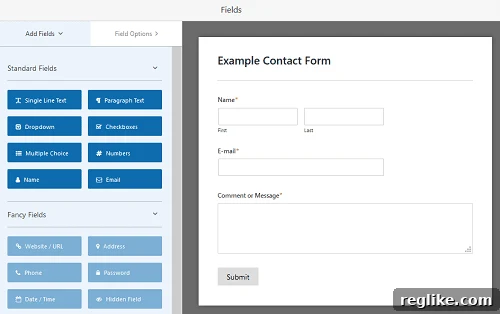
The builder is divided into two main sections: on the left, you’ll find a panel containing various available fields, categorized for easy navigation (Standard Fields, Fancy Fields, etc.). On the right, you’ll see a live preview of your form. To add new fields to your contact form, simply click on the desired field from the left panel and drag it over to the position you wish it to appear on your working form. You can also reorder existing fields by dragging and dropping them.
Customizing individual fields is equally straightforward. Click on any field within your form preview, and the left panel will automatically switch to the “Field Options” tab, allowing you to modify its label, description, format (e.g., single line, paragraph text), and whether it’s a required field for submission. You can also add placeholder text, specify CSS classes for advanced styling, and configure other field-specific settings.
For instance, let’s say you want to add a checkbox to your form to understand the user’s inquiry type. You would drag the Checkboxes field from the left panel into your form. Then, by clicking on the newly added checkbox field, you can customize its label (e.g., “What is your inquiry about?”), add individual choices (e.g., “General Question,” “Support Request,” “Partnership Opportunity”), and even make selecting one of the boxes a requirement for form submission. This level of customization allows you to gather precise information from your visitors.
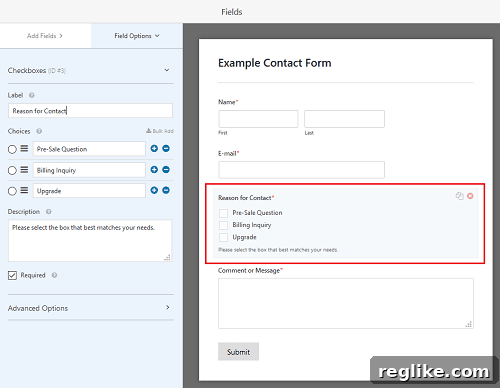
One of the most powerful aspects of this builder is the real-time preview. As you drag & drop fields, customize labels, and adjust settings, you immediately see how these changes will appear to your site visitors. This eliminates the need to constantly save and preview your form, significantly streamlining the design process and ensuring that the final output perfectly matches your vision. You can add an unlimited number of fields to your form, creating highly specialized forms if needed, even with the Lite version.
Once you are satisfied with the structure and customization of your contact form, it is essential to click the Save button located at the top right of the builder. This action preserves all your changes, ensuring your meticulously crafted form is ready for the next steps.
Step 4: Configuring Form Settings
After you have perfected the visual layout and field structure of your contact form, the next crucial step is to configure its underlying settings. These settings control how your form behaves, how notifications are handled, and what your users experience after submission. To access these options, click on the Settings tab located on the left-hand panel within the WPForms builder.
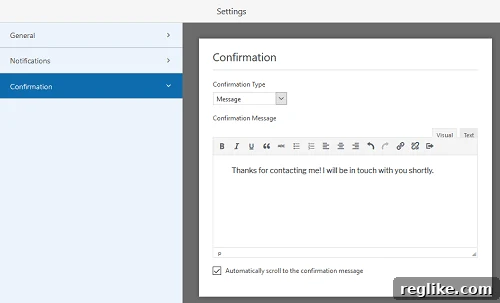
Within the Settings tab, you will primarily interact with three key sections:
- General Settings:
This section allows you to fine-tune the basic attributes of your form. Here, you can change your form’s name if you decide on a more fitting title later, and provide a detailed description for internal reference. You also have the flexibility to customize the text displayed on your form’s submit button – instead of the generic “Submit,” you might opt for more engaging calls to action like “Send My Message,” “Get a Quote,” or “Connect With Us.” Additionally, this section is where you can enable the robust anti-spam honeypot feature. The honeypot works silently in the background, adding a hidden field that only bots can see and fill, effectively blocking most automated spam submissions without requiring any input from human users.
- Notifications:
The Notifications settings are critical for ensuring you receive timely alerts whenever a new form entry is submitted. By default, WPForms Lite is configured to send notifications to the Admin Email address associated with your WordPress website. However, you have complete control to customize this. If you wish to have inquiries sent to a specific departmental email address (e.g., [email protected] or [email protected]), you can easily change it here. Furthermore, you can configure notifications to be sent to multiple email addresses simultaneously by simply separating each address with a comma. This is incredibly useful for teams or when multiple individuals need to be aware of new submissions. You can also customize the subject line and content of these notification emails, ensuring they provide all the necessary information at a glance. For enhanced user experience, you might also consider setting up an auto-responder notification for your visitors, confirming their submission was received.
- Confirmation:
The Confirmation settings define what happens immediately after a site visitor successfully submits your contact form. This is an important step for user experience and can also play a role in your conversion tracking. You have three main options:
- Message: Display a customizable message directly on the page after submission. This is the most common approach, offering a simple “Thank You for contacting us! We’ll be in touch shortly.” message, reassuring the user their submission was successful.
- Show Page: Redirect the user to a specific page on your website, such as a dedicated “Thank You” page. This approach is highly recommended for tracking conversions (e.g., in Google Analytics) and for providing additional content or next steps to the user (e.g., “While you wait, check out our latest blog posts”).
- Go to URL (Redirect): Redirect the user to an external URL. This can be useful for sending users to a special offer page, a partner site, or any other relevant web address outside your primary domain.
Regardless of your choice, make sure the confirmation message (if using the ‘Message’ option) is clear, polite, and sets appropriate expectations for when the user can expect a response.
Remember to click the Save button again after adjusting your form’s settings to ensure all changes are applied.
Step 5: Adding Your Form to Your WordPress Website
With your contact form meticulously customized and its settings configured, the final step is to display it prominently on your website. WPForms Lite makes this process incredibly user-friendly, ensuring you can integrate your form into any page or post with ease.
First, close out of the WPForms Lite builder interface. You can do this by clicking the ‘X’ button or navigating back to your WordPress dashboard. Next, decide where you want your contact form to appear. Most websites typically feature a contact form on a dedicated “Contact Us” page, but you might also want to embed it within a relevant blog post, on your “About Us” page, or even in a sidebar widget.
Navigate to the specific post or page where you intend to display your contact form. If you’re creating a new page, go to Pages > Add New. If you’re editing an existing page, go to Pages > All Pages and select the page you wish to modify. For this example, let’s assume you’re adding it to your main Contact Page.
When you are in the WordPress Block Editor (Gutenberg) or the Classic Editor, you will notice a new, dedicated Add Form button conveniently integrated into the editor toolbar. This button is a WPForms Lite addition, designed to simplify form insertion.
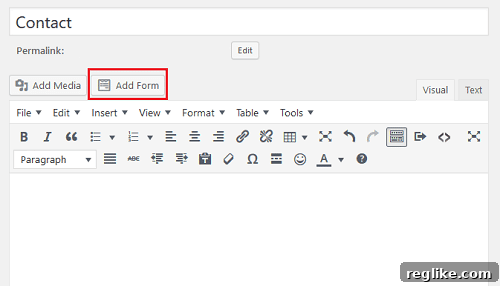
Click on this Add Form button. A modal window will appear, presenting you with a dropdown menu listing all the forms you have created with WPForms. Select the specific contact form you wish to include on your current post or page (e.g., “Example Contact Form”).
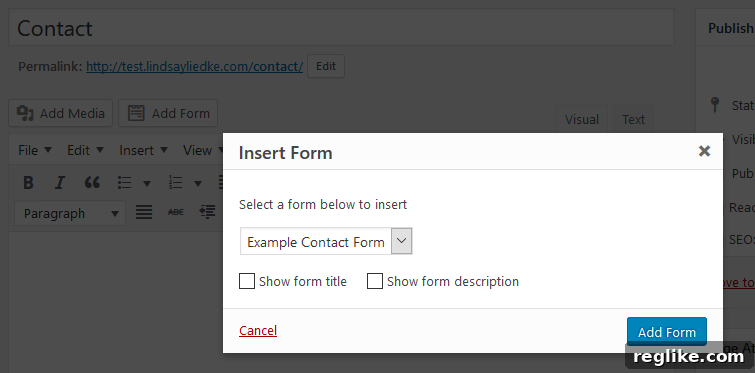
Once you select the desired form, WPForms Lite will automatically insert the appropriate shortcode into your post or page content. A shortcode is a small piece of text, enclosed in square brackets (e.g., [wpforms id="123" title="false"]), that WordPress uses to execute specific functions or display content generated by plugins. This shortcode will render your fully designed contact form on the frontend of your website.
After the shortcode is inserted, click Update (for an existing page) or Publish (for a new page) to save your changes. You can then view your post or page to see your newly added contact form in action. Your contact page, now featuring a professional and functional form, might look something like this:
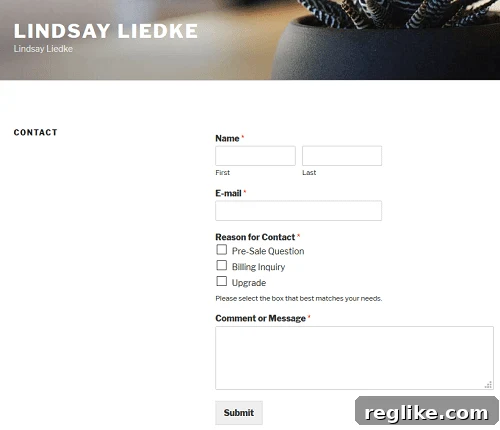
Remember to always test your form after embedding it. Submit a test entry to ensure notifications are sent correctly and the confirmation message or redirect functions as expected.
Final Thoughts: Empowering Communication and Growth
In conclusion, the ability to seamlessly add a contact form to your WordPress website is not just about ticking a box; it’s about opening a direct, reliable channel for interaction with your audience. As we’ve seen, the process is remarkably simple, especially when utilizing a powerful yet user-friendly plugin like WPForms Lite.
Implementing a contact form is an extremely helpful strategy for forging stronger relationships with your site visitors. It provides them with a clear, accessible avenue to ask questions, voice concerns, offer feedback, and initiate collaborations. For you, it translates into invaluable opportunities to provide exceptional customer support, gather insights that can drive improvements, and most importantly, boost conversions – whether that means securing new subscribers for your newsletter, generating qualified leads for your business, or transforming casual visitors into loyal customers.
A well-designed and functional contact form builds trust, signals professionalism, and ensures that no potential connection goes unheard. It streamlines communication, making it easy for users to reach out without needing to open their email client or search for your contact details elsewhere. This convenience significantly enhances the overall user experience on your website.
If you are in the market for an intuitive, high-quality, and versatile contact form solution for your WordPress site, we wholeheartedly recommend you check out WPForms. Its Lite version alone provides a robust set of features that meet the needs of most websites, offering a powerful drag & drop builder, pre-built templates, and essential spam protection. Chances are, even the free version will provide exactly what you’re looking for to foster better communication and drive growth on your platform. Take the step today to empower your website with an effective contact form and unlock new possibilities for engagement and success.