
Are you looking to streamline the management of your recently acquired expired domains? Specifically, do you need to transfer multiple domain names from NameBright to another registrar? This comprehensive guide will walk you through the precise steps to efficiently obtain authorization codes in bulk from NameBright, enabling a smooth and consolidated domain portfolio.
In the dynamic world of domain investing and online presence, acquiring valuable expired domains is a highly sought-after strategy. Platforms like DomainCatch and DropCatch are at the forefront, offering unparalleled opportunities to secure fully deleting domain names that still hold significant SEO value or brand potential. These domains, once won through auction or backorder, are automatically registered and managed within a NameBright account. This automatic integration occurs because NameBright is part of the same corporate umbrella as DropCatch, providing a convenient initial home for your new acquisitions.
NameBright, as a registrar, offers several compelling advantages, not least of which is its “at cost” pricing model for those who pre-fund their accounts. For many users, keeping domains at NameBright is a perfectly viable and cost-effective solution. However, experienced domain investors and webmasters often prefer to consolidate their entire domain portfolio under a single, preferred registrar. This strategy simplifies management, unifies billing cycles, and provides a consistent interface for managing DNS, renewals, and other critical domain services.
While NameBright excels in many areas, the process for retrieving authorization codes, particularly in bulk, can be somewhat less intuitive than with other registrars. Recognizing this common challenge, we’ve developed this detailed, step-by-step guide. Our aim is to demystify the process, ensuring you can quickly and efficiently obtain the necessary authorization codes to transfer your valuable expired domains to the registrar of your choice, thereby optimizing your domain management workflow.
Why Consolidate Your Expired Domain Portfolio?
The decision to transfer domains from NameBright to another registrar, despite NameBright’s competitive pricing, often stems from strategic considerations crucial for efficient domain portfolio management. Understanding these reasons can highlight the importance of mastering the bulk authorization code retrieval process:
- Unified Management and Simplified Billing: Managing domains spread across multiple registrars can become a logistical nightmare. Consolidating them under one roof means a single login, one interface to learn, and a unified billing cycle for all renewals, drastically reducing administrative overhead and the risk of accidental expirations.
- Access to Specific Features and Services: Different registrars offer varying sets of tools, features, and premium services. Some users might prefer a registrar known for its advanced DNS management, integrated hosting solutions, robust API access, or specific security features that better align with their operational needs.
- Consistent User Experience: Familiarity with a particular registrar’s dashboard and support system can significantly enhance productivity. Transferring domains allows you to leverage your existing comfort and expertise with a preferred platform.
- Potentially Better Long-Term Renewal Rates: While NameBright offers great initial pricing, other registrars might have loyalty programs or promotional renewal rates that prove more economical over the long term, especially for large portfolios.
- Integration with Existing Infrastructure: Many webmasters have existing servers, CDN services, or other web infrastructure that integrates seamlessly with specific registrars, making transfers a logical step to maintain this synergy.
Ultimately, the goal is to create an organized, efficient, and cost-effective domain management ecosystem, and transferring domains to your registrar of choice is a crucial step in achieving that.
Understanding Authorization Codes: The Key to Secure Domain Transfers
Before diving into the steps, it’s essential to understand what an authorization code is and why it’s so vital for domain transfers. Often referred to as an EPP key (Extensible Provisioning Protocol key) or a transfer code, this is a unique alphanumeric code assigned to each domain name by its current registrar.
- Security Measure: The primary purpose of an authorization code is security. It acts as a password, proving that the person initiating the domain transfer has legitimate control over the domain. Without this code, unauthorized parties would be able to transfer your domain, potentially leading to loss of ownership and significant business disruption.
- ICANN Mandate: The requirement for authorization codes is stipulated by ICANN (Internet Corporation for Assigned Names and Numbers), the global body responsible for coordinating the internet’s naming system. This ensures a standardized and secure transfer process across all accredited registrars worldwide.
- Facilitating Transfers: When you wish to transfer a domain to a new registrar (the “gaining registrar”), you must provide this authorization code. The gaining registrar then uses this code to initiate the transfer request with the current registrar (the “losing registrar,” in this case, NameBright).
It’s crucial to handle authorization codes with the same level of care you would a password. They should be kept confidential and only provided to the gaining registrar during the transfer initiation process.
Before You Begin: Essential Prerequisites for a Smooth Transfer
While the steps for retrieving authorization codes are straightforward, there are a couple of critical prerequisites that must be met to ensure your domain transfers proceed without hitches. Failing to address these can lead to delays or even outright rejection of your transfer requests:
1. Observe the 60-Day Transfer Lock
One of the most important rules, mandated by ICANN, is the 60-day transfer lock. This means that a newly registered domain name, or a domain that has recently been transferred between registrars, cannot be transferred again for a period of 60 days. This policy is in place to protect domain registrants from fraudulent transfers and to allow a cooling-off period after a significant domain action.
- What it means for you: If you’ve just won an expired domain on DropCatch, the 60-day clock starts from the moment it’s officially registered under your NameBright account. You must wait for this period to expire before attempting any transfer.
- Checking the date: You can usually find the original registration date in your NameBright account dashboard or by performing a WHOIS lookup for the domain.
- Future Changes: It’s worth noting that ICANN policies are always evolving. There are ongoing discussions about potentially shortening this transfer lock period to 30 days in the future, which could expedite domain management for investors. However, for now, the 60-day rule remains firmly in place.
2. Other Considerations
- Domain Unlock Status: Most domains need to be “unlocked” before they can be transferred. While NameBright’s process often handles this implicitly when generating auth codes, it’s good practice to ensure your domains are unlocked if you encounter issues.
- WHOIS Privacy: In some rare cases, enhanced WHOIS privacy services can interfere with transfer verification. While less common now, be prepared to temporarily disable privacy if a transfer fails due to contact verification issues.
- Current Contact Information: Ensure that the administrative contact email address associated with your domains in NameBright is current and accessible, as transfer approval emails are often sent to this address.
Step-by-Step Guide: Retrieving Bulk Authorization Codes from NameBright
Now, let’s dive into the core process. Follow these steps precisely to efficiently download authorization codes for multiple domains from your NameBright account.
Step 1: Verify the 60-Day Transfer Lock Period (Crucial First Check)
Before you proceed with any other steps, re-confirm that all the domains you intend to transfer have successfully passed their 60-day transfer lock period. As discussed, this is a non-negotiable ICANN policy. Attempting to generate an authorization code or initiate a transfer before this period ends will result in failure. You can easily check the registration date for each domain within your NameBright account dashboard. If any domain hasn’t met this criterion, you’ll need to wait for its respective lock period to expire.
Step 2: Strategically Categorizing Your Domains for Bulk Export
NameBright’s system leverages categories for efficient bulk operations. This step is pivotal for organizing the domains you wish to transfer out.
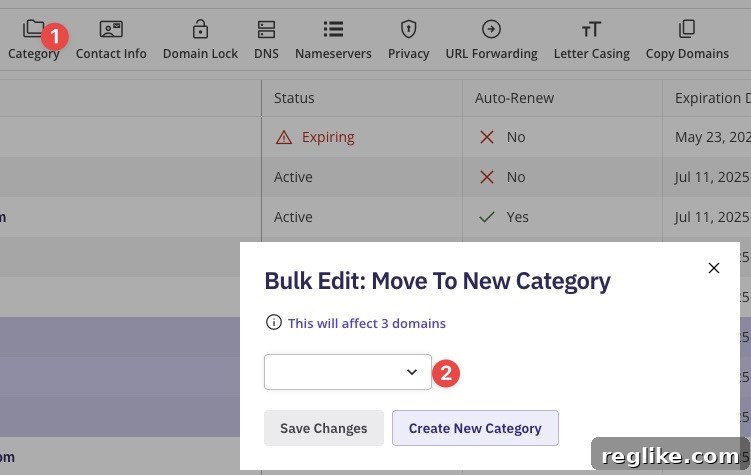
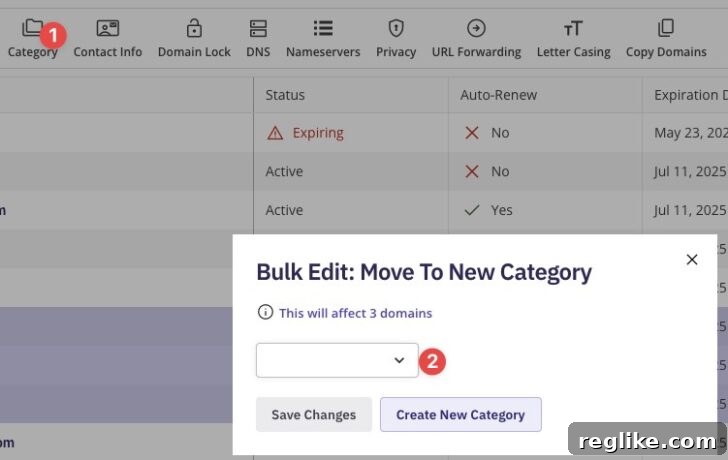
Begin by logging into your NameBright account and navigating to your list of domains. Carefully select each domain name for which you need authorization codes. Once all desired domains are highlighted or checked, look for the “Category” option, typically located at the top of your domain list interface. Click on it. A prompt will appear, allowing you to either assign the selected domains to an existing category or create a new one. For clarity and ease of management, we highly recommend creating a new category specifically for this purpose, perhaps named something intuitive like “Transfer Out [Current Date]” or “Domains for Transfer.” This organizational step ensures you only export codes for the domains you intend to move.
Step 3: Navigating to Your Domain Categories
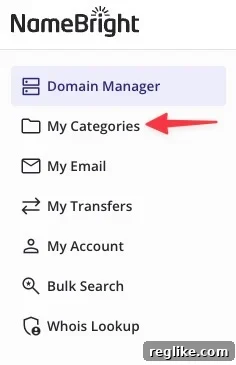
After you’ve successfully categorized your domains, the next step is to access that specific category. On the left-hand side of your NameBright dashboard, you will find a navigation menu. Locate and click on the “My Categories” option. This action will display a list of all the custom categories you have created within your NameBright account. This ensures you’re isolating the specific batch of domains you prepared for transfer, preventing accidental export of codes for domains you intend to keep at NameBright.
Step 4: Accessing the Specific Category
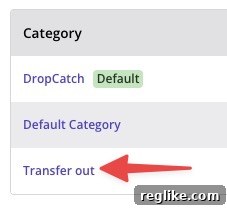
From the list of “My Categories” that appeared in the previous step, click on the exact name of the category you just created (e.g., “Transfer Out”). Clicking the category name will open it, displaying only the domain names that you had assigned to it in Step 2. This focused view is crucial for verifying that you are working with the correct set of domains before proceeding with the authorization code download.
Step 5: Locating the ‘More Tools’ Option
With your selected category open and the domains displayed, you’re now ready to find the export function. On the right-hand side of the page, or sometimes near the top of the domain list, you will see a button or link labeled “More Tools.” This section typically houses advanced domain management functionalities, including the bulk export options. Click on “More Tools” to reveal a dropdown or a new set of options.
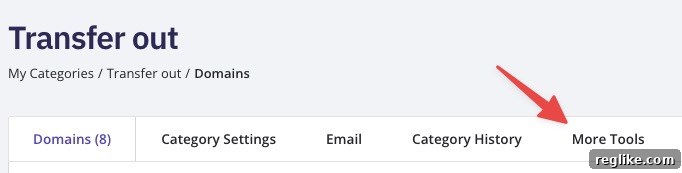
Step 6: Initiating the Authorization Code Download
Within the “More Tools” menu, you will find several options. Look for and select “Download Auth Codes.” This is typically the second option in the list. Clicking this option will trigger an immediate download of a file to your computer. This file will be in a simple CSV (Comma Separated Values) format, which can be easily opened with any spreadsheet program like Microsoft Excel, Google Sheets, or LibreOffice Calc.
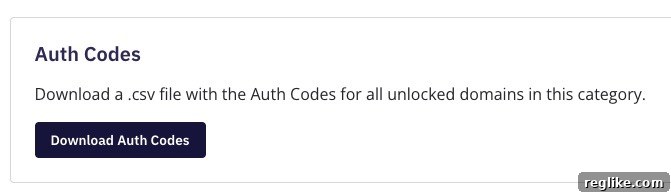
Upon opening the CSV file, you will find a clear and organized list. Your domain names will be conveniently listed in the first column, and their corresponding authorization codes (EPP keys) will be precisely positioned in the second column. This format makes it exceptionally easy to copy and paste the codes when initiating transfers at your gaining registrar.
After Downloading: What to Do Next for a Seamless Transfer
Once you have successfully downloaded the CSV file containing your authorization codes, the next phase involves initiating the actual transfers and ensuring the security of your valuable domain assets. Here’s what you should do:
1. Review and Verify the CSV File
Before proceeding, take a moment to open the downloaded CSV file and quickly scan its contents. Ensure that all the domains you intended to include are present and that their authorization codes appear to be in the correct format (typically a string of alphanumeric characters). A quick visual check can save potential headaches later.
2. Initiate Transfers at Your Gaining Registrar
With your authorization codes in hand, you can now visit your preferred domain registrar (the “gaining registrar”) where you wish to consolidate your domains. Look for an option like “Transfer Domain,” “Transfer In,” or “Bulk Transfer.” You will typically be prompted to enter the domain name and its corresponding authorization code for each domain. For bulk transfers, many registrars offer a feature to upload a list of domains and their codes directly from a CSV, making the process even faster.
3. Security Best Practices for Your Authorization Codes
Authorization codes are sensitive information. Treat them as you would any critical password:
- Delete After Use: Once you have successfully initiated all your transfers and confirmed their pending status with your gaining registrar, it’s a good practice to delete the CSV file from your computer. If you need it again, you can always re-download it from NameBright.
- Do Not Share: Never share your authorization codes with unauthorized individuals. Only provide them directly to the gaining registrar during the official transfer process.
- Secure Your Accounts: Ensure your NameBright account, and especially your gaining registrar account, are secured with strong, unique passwords and two-factor authentication (2FA).
4. Troubleshooting Common Transfer Issues
While the process is generally smooth, occasional issues can arise. Here are some common ones and how to address them:
- Transfer Rejected: This is often due to the 60-day lock, an incorrect authorization code, or a domain being locked. Double-check these factors.
- Email Verification: Transfers often require email verification sent to the administrative contact. Ensure your contact email in NameBright is current and that you check your spam folder.
- Privacy Settings: While less common today, some registrars might flag transfers if WHOIS privacy is enabled. If all else fails, consider temporarily disabling it.
- Contact Support: If you encounter persistent problems, don’t hesitate to contact NameBright’s customer support. They can provide specific insights into your domain’s status and help resolve any technical hurdles.
Conclusion: Empowering Your Domain Management Strategy
Mastering the art of efficient domain management is a cornerstone of success for any serious domain investor or webmaster. By understanding and utilizing NameBright’s bulk authorization code retrieval feature, you gain a significant advantage in consolidating your valuable expired domain wins. This guide has broken down what initially might seem like an unintuitive process into clear, actionable steps, from observing the crucial 60-day transfer lock to strategically categorizing your domains and finally downloading the essential EPP keys.
The ability to seamlessly transfer domains acquired through platforms like DropCatch and DomainCatch into your preferred management environment not only saves time but also enhances security and simplifies the overall administration of your digital assets. Embrace these efficient strategies, and you’ll be well-equipped to grow and manage a robust, organized, and high-performing domain portfolio for years to come.