
Unlock the full potential of your domain portfolio by mastering GoDaddy’s API for efficient DNS record management. This comprehensive tutorial guides you through retrieving and updating DNS records, including specific Type and Name entries, enabling seamless automation for tasks like Sedo ownership verification.
Managing a large portfolio of domain names often comes with its unique set of challenges. For domain investors and webmasters, efficiency and automation are paramount. Recently, I embarked on a journey to list several of my GoDaddy-managed domain names for sale on Sedo, one of the leading global marketplaces for domain transactions. While the initial process of adding domains to Sedo’s system was straightforward, I quickly encountered a significant hurdle: Sedo’s ownership verification process, which proved to be surprisingly cumbersome, especially when dealing with multiple domains.
For individuals with just a handful of domains, manual ownership verification might not pose a major issue. It typically involves adding a specific DNS record, such as a TXT or CNAME entry, at your domain registrar for each domain. However, this seemingly simple task scales poorly. If you’re looking to list more than five domains, the time and effort required for manual verification can quickly become a bottleneck, making you rethink your approach to Sedo’s ownership verification process.
Many users opt for bulk updating name servers, directing their domains to Sedo’s name servers to simplify the verification. But what if you prefer to retain your current name server settings, or simply don’t wish to park your domains with Sedo? This is where the power of automation through an Application Programming Interface (API) becomes indispensable. This tutorial is specifically designed to address this very predicament. We will delve into how to leverage GoDaddy’s robust API to programmatically update DNS records for a given domain, specifying both the Type and Name of the record.
By the end of this step-by-step guide, you will possess the knowledge and practical example to develop your own sophisticated bulk update tool. This tool will streamline the Sedo ownership verification process, especially if your valuable domain assets are managed under a GoDaddy account. Beyond Sedo, the principles learned here can be applied to a wide array of automated domain management tasks, saving you countless hours and enhancing your overall operational efficiency.
Getting Started: Your Gateway to the GoDaddy API
Before we dive deep into the intricacies of updating DNS records, it’s essential to establish a foundational understanding of how to interact with GoDaddy’s API. For the scope of this tutorial, we will not spend extensive time covering the very basics of setting up your developer environment or obtaining API credentials. However, if you are new to the GoDaddy Developer Portal and its API ecosystem, familiarizing yourself with these prerequisites is crucial for a successful implementation.
The GoDaddy API provides a powerful interface for automating various domain and hosting management tasks, from registering new domains to configuring complex DNS settings. To begin your journey, you’ll need to create a developer account and generate API keys. These keys serve as your unique credentials, authenticating your requests to GoDaddy’s servers and ensuring the security of your account and domain data. Think of them as the digital handshake between your application and GoDaddy’s infrastructure.
To assist you in getting started, I highly recommend exploring the following official GoDaddy developer resources:
- GoDaddy Developer Portal – Create Account: This is your starting point for registering a developer account and accessing all necessary tools and documentation.
- GoDaddy API Credentials: Learn how to generate and manage your API keys (a ‘Key’ and a ‘Secret’). These are vital for authenticating your API calls. Remember to keep your API Secret highly confidential, as it grants access to your account.
- GoDaddy API Documentation: The official documentation is an invaluable resource, providing detailed information on all available endpoints, request parameters, response formats, and error codes.
- Get Started Using GoDaddy API with PHP: While our tutorial focuses on a specific task, this external guide offers a broader introduction to using the GoDaddy API with PHP, which can provide additional context and examples.
Once you have successfully created your developer account and secured your API credentials, you are well-prepared to proceed with integrating GoDaddy’s powerful API into your domain management workflows. Let’s move forward and explore the specific API methods relevant to our goal of updating DNS records.
Exploring Methods for Adding and Replacing GoDaddy DNS Records
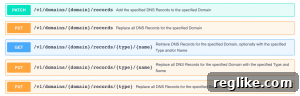
The GoDaddy API offers a variety of methods for interacting with DNS records, providing granular control over your domain’s configuration. These methods allow you to retrieve existing records, add new ones, update specific entries, or even replace entire sets of records for a given domain. Understanding these options is key to choosing the most appropriate approach for your specific task. The image below illustrates some of the available API methods for managing DNS records.
For the purpose of this tutorial, particularly for streamlining the Sedo ownership verification process, we will concentrate on a specific and highly effective API method. This method is designed to replace all DNS records for a designated Domain that match a specified Type and Name. This targeted replacement capability is ideal when you need to ensure a unique verification record is present without inadvertently duplicating or conflicting with other records of the same type and name.
The choice of this particular PUT method is deliberate and directly aligns with the requirements of Sedo’s ownership verification process. Sedo typically requires the creation of either a TXT or a CNAME record, containing a unique verification ID that they provide. The PUT method allows us to precisely target and update or create this specific record. This ensures that the Sedo verification ID is correctly placed in your domain’s DNS, enabling swift and successful ownership validation.
While this tutorial specifically instructs you on how to add a TXT record for Sedo verification, it’s important to note the flexibility of this approach. The code can be very easily modified to add a CNAME record instead, should your specific verification needs or preferences dictate. This adaptability makes the solution robust and applicable to various scenarios where specific DNS records need to be managed on your GoDaddy-managed domains.
Setting Up Required and Optional Variables for DNS Automation
To begin constructing our DNS update script, open your preferred text editor and create a new file named dns-recorder.php. This file will house all the logic required to interact with the GoDaddy API and manage your DNS records. The first step in our script involves defining the domains you intend to manage. We’ll achieve this by creating a variable, specifically an array, to hold a list of your GoDaddy domains that are either currently listed or soon to be listed on Sedo.
$domains = array(
“mckinneydigital.com”,”dallasdigital.com”,”austindigital.com”
);
If you only have a single domain to process, the array can be simplified as follows:
$domains = array(
“mckinneydigital.com”
);
To ensure that our DNS record update applies to every domain within our defined array, we will implement a foreach statement. This control structure is crucial for iterating over each value in the $domains array, guaranteeing that a DNS record is added or updated for every domain, rather than just the first one. This forms the backbone of our bulk processing capability.
foreach($domains as $domain){
// Additional code for processing each domain will go here
}
Within this foreach loop, we will define several essential variables. These include your GoDaddy API credentials, which are vital for authentication, as well as specific variables pertaining to the DNS record itself. These DNS record variables will carry the necessary information, such as the type of record, its name, and the data it should contain. It is absolutely critical to replace the placeholder values with your actual API Key and Secret; failure to do so will render the entire script inoperable.
It’s essential to add your respective API Key and Secret for authentication, or else this tutorial is dead in the water.
Below is a detailed breakdown of the DNS record variables and their respective values that need to be defined:
-
$dns_domain: This variable will store the current domain being processed in the loop. We’ll use PHP’sstrtolowermethod to ensure that all domain names are consistently lowercased, which is a standard practice for domain handling.
-
$dns_type: Set this value to TXT or CNAME, depending on Sedo’s specific requirement. Other common DNS record types you might encounter include: Nameserver, A, MX, SRV, AAAA, CAA, each serving a different purpose in domain resolution.
-
$dns_name: For most root domain verifications, this value should be set to @. This symbol typically refers to the root domain itself. However, for subdomain verification, this could be a specific subdomain name (e.g., ‘www’, ‘blog’).
-
$dns_data: This is where you will input your unique Sedo verification ID. This alphanumeric string is provided by Sedo and acts as proof of your domain ownership.
-
$dns_port: Set the port value, commonly 80 for HTTP or 443 for HTTPS. While not always strictly required for TXT records, it’s a standard field in DNS record structures.
-
$dns_priority: For records like MX or SRV, priority dictates the order in which multiple records are tried. For TXT records, it’s often set to a default value like 10 or an increment of 5. It signifies the preference for a particular record.
-
$dns_protocol: This refers to the protocol for SRV records. For a TXT record, it’s not strictly necessary, so you can set it to a placeholder like ‘string’ for this tutorial.
-
$dns_service: Similar to protocol, this field is relevant for SRV records. For a TXT record, you can set it to ‘string’ as a placeholder.
-
$dns_ttl: Time To Live (TTL) specifies how long a DNS resolver should cache the record before querying for a new one. A common value is 600 seconds (10 minutes). Other options include 1/2 hour, 1 Hour, 12 hours, 1 Day, 1 Week, or Custom. A lower TTL means changes propagate faster but can increase DNS query load.
-
$dns_weight: For records with the same priority, weight helps distribute traffic. For TXT records, a default value like 10 or an increment of 5 is usually sufficient.
With all the aforementioned individual DNS record parameters defined and their respective values set, the next step is to consolidate these into a single, structured variable: $dns_records. This variable will encapsulate the last seven parameters as a JSON object string, which is the format GoDaddy’s API expects for updating DNS records. JSON (JavaScript Object Notation) is a lightweight data-interchange format that is easy for humans to read and write and easy for machines to parse and generate.
$dns_records = “[{\\”data\\”: \\”$dns_data\\”,\\”port\\”: $dns_port,\\”priority\\”: $dns_priority,\\”protocol\\”: \\”$dns_protocol\\”,\\”service\\”: \\”$dns_service\\”,\\”ttl\\”: $dns_ttl,\\”weight\\”: $dns_weight}]”;
Note the use of backslashes to escape the double quotes within the JSON string, ensuring it is correctly parsed as a single string literal in PHP. This structured JSON string is now ready to be sent as the payload for our API request.
Initiating the GoDaddy API Call to Add DNS Records
With all the necessary variables meticulously defined and their values appropriately set, we are now poised to make the actual call to the GoDaddy API to add or update our DNS records. This crucial step is facilitated by a user-defined function named addDNSRecord, which encapsulates the complexity of the API interaction, allowing for cleaner and more modular code.
First, define a variable, for instance, named $results, and assign the output of our addDNSRecord function to it. This function is designed to handle the heavy lifting of communicating with the GoDaddy API. It requires four specific arguments to be passed in their correct order: $dns_domain (the domain name), $dns_type (the type of DNS record, e.g., TXT), $dns_name (the name of the record, e.g., ‘@’), and $dns_records (the JSON string containing the record’s data and other parameters).
$results = addDNSRecord($dns_domain, $dns_type, $dns_name, $dns_records);
This single line of code is the heart of our automation process. When executed, the addDNSRecord function will construct an HTTP request, authenticate with your GoDaddy API credentials, and send the specified DNS record data to the GoDaddy servers. The response from the API, indicating success or failure, will then be captured in the $results variable, which we will use for error checking.
Implementing Robust Error Checking for the addDNSRecord Function
The final, yet equally important, step in our DNS management script is to implement a robust error-checking mechanism. While you have the flexibility to design highly detailed error handling, for this tutorial, we will focus on a straightforward pass or fail message. This basic check will determine whether the API call was successful based on the value returned by the $results variable.
if(!$results){
echo “All good in hollywood for the following domain: $dns_domain
“;
} else {
echo “Houston, we have a problem with the following domain: $dns_domain!”;
}
In this simplified error-checking block:
- If the $results variable evaluates to false (or empty, depending on how your addDNSRecord function is structured to return a value on success), it implies that the API call was successful, and the DNS record was updated or added without issues. In this scenario, a success message is displayed:
All good in hollywood for the following domain: < your domain displayed >
- Conversely, if the API call encounters an error or returns a non-empty value (which might contain error details from the API response), the else block will execute. This indicates a problem occurred during the API interaction, and a failure message is displayed:
Houston, we have a problem with the following domain: < your domain displayed >
For production environments, you would ideally expand this error handling significantly. This could involve parsing the specific error codes and messages returned by the GoDaddy API (e.g., HTTP status codes like 400 Bad Request, 401 Unauthorized, 404 Not Found, 429 Too Many Requests) to provide more diagnostic information. You might also implement logging mechanisms to record successful and failed attempts, aiding in debugging and auditing.
Upon a successful API call, you should be able to verify the newly added or updated DNS record directly within GoDaddy’s Domain Manager interface. This record will contain the Sedo verification ID, confirming your ownership and progressing the listing process. When assembled, the core logic of our script, excluding the detailed implementation of the addDNSRecord function itself, consists of approximately 40 concise lines of PHP code, demonstrating the efficiency of this API-driven approach.
And with that, the core functionality for automating your DNS record updates is complete. Now, let’s explore the underlying function that powers these API interactions.
Dissecting the addDNSRecord Function: The Core of Our Automation
The addDNSRecord function is undoubtedly the workhorse of our entire solution. It’s a singular, self-contained unit responsible for executing the demanding task of communicating with the GoDaddy API to add or modify DNS records for your specified domains. This function abstracts away the complexities of HTTP requests, authentication, and payload formatting, providing a clean interface for the rest of our script.
A critical component within this function is the GoDaddy API URL endpoint it targets. For our specific operation of replacing DNS records by their Type and Name, the URL structure is precisely defined as:
https://api.godaddy.com/v1/domains/$DNS_domain/records/$DNS_type/$DNS_name
This URL demonstrates a RESTful API design, where each segment of the path represents a resource. `$DNS_domain`, `$DNS_type`, and `$DNS_name` are dynamic placeholders that get populated with the actual domain, record type (e.g., ‘TXT’), and record name (e.g., ‘@’) from our variables. This clear structure makes the API intuitive to use and understand.
Another key aspect of this function is its utilization of the PUT HTTP request method. Unlike previous tutorials that might have focused on GET (for retrieving data) or POST (for creating new resources), the PUT method is specifically chosen here because its semantic purpose is to *replace* existing resources at a given URL. In our context, this means that for the specified domain, record type, and record name, any existing records matching these criteria will be completely replaced by the data provided in our JSON payload. If no such record exists, a new one will be created. This behavior is crucial for ensuring that the Sedo verification ID is the definitive entry for its respective record.
The function typically includes setting HTTP headers, such as ‘Authorization’ (containing your API Key and Secret) and ‘Content-Type: application/json’ (indicating the format of the data being sent). It then uses a suitable HTTP client library or built-in functions (like cURL in PHP) to execute the request and handle the response. Understanding the core logic within this function empowers you to adapt it for future needs. You can easily modify the API URL for different endpoints (e.g., retrieving all records), change the request type (e.g., DELETE for removing records), or alter the payload structure to interact with various GoDaddy API functionalities.
Concluding Thoughts and Future Enhancements
We’ve reached the culmination of our tutorial, and I trust that you now possess a solid understanding of how to leverage the GoDaddy API for efficient DNS record management, particularly for automating tasks like Sedo ownership verification. The ability to programmatically update DNS records is a powerful asset for anyone managing a substantial domain portfolio, translating into significant time savings and a reduction in manual errors.
I wholeheartedly encourage you to take the next step: download the provided tutorial code. Experiment with it, make the necessary modifications to incorporate your own domain list and API credentials, and observe firsthand the power of automation. This tool, while seemingly simple, opens doors to a more streamlined and scalable approach to domain management. The core principles and techniques demonstrated here are broadly applicable and can serve as a foundation for a myriad of other automated tasks.
DOWNLOAD dns-recorder.zip for GoDaddy Domains API
Beyond the immediate application of Sedo verification, consider the potential for enhancing this tool. You could easily modify the script to incorporate a user-friendly HTML form interface, perhaps styled with popular frameworks like Bootstrap or simply utilizing basic HTML5 elements. This would transform a backend script into a more accessible utility for non-technical users or for quick, on-demand updates.
Further enhancements could include:
- Database Integration: Instead of a static array, connect to a database to dynamically manage your list of domains and verification IDs.
- Advanced Error Handling & Logging: Implement more sophisticated error parsing to provide specific feedback on API failures and log all transactions for auditing and debugging.
- User Authentication: If building a web interface, add user authentication to secure access to your domain management tool.
- Scheduling: Integrate with a cron job or similar scheduling service to automatically run verification checks or perform routine DNS updates.
- API Rate Limit Management: For very large portfolios, be mindful of GoDaddy’s API rate limits and build in mechanisms to handle them gracefully (e.g., pauses between requests).
Your feedback and experiences are invaluable. Please do not hesitate to leave comments below if you have any questions, encounter technical challenges during implementation, or discover exciting new ways to extend this tutorial. Engaging with the community helps us all grow and refine our automation skills. Thank you for following along, and happy automating!