
Move a site to Wix? Here’s how to forward old URLs to new ones effortlessly.
Seamless Site Migration: Setting Up 301 Redirects on Wix to Preserve Your SEO
Migrating a website to a new platform like Wix can be an exciting step, offering fresh design possibilities and enhanced features. However, beneath the surface of visual appeal lies a critical technical aspect that, if overlooked, can severely damage your site’s search engine rankings and user experience: URL structure changes. When you move your site, it’s common for the paths to your pages to change, meaning all those links Google has carefully indexed, and users have bookmarked, suddenly lead to dead ends.
This exact scenario played out recently when I undertook the task of moving Comptroller.com to the robust Wix platform. The transition brought many improvements, but the new environment didn’t allow for an identical replication of the old URL structure. This created a potential SEO nightmare: Google’s index was filled with links to pages that no longer existed at their original addresses. The immediate and crucial task was to inform Google – and any user attempting to reach these old URLs – exactly where the new content resided.
Fortunately, Wix, with its user-friendly approach, offers a built-in solution: a powerful URL forwarding tool that facilitates the implementation of 301 redirects. For my site, which was relatively modest in size, the “manual” tool proved perfectly adequate for meticulously adding these essential redirects. This guide will walk you through the precise steps to leverage this feature, ensuring your site migration is as smooth and SEO-friendly as possible.
Why 301 Redirects are Non-Negotiable for Website Migrations
Before diving into the “how-to,” let’s solidify the “why.” Understanding the importance of 301 redirects is fundamental to appreciating their value during any website overhaul or migration, especially when moving to a platform like Wix.
What is a 301 Redirect?
A 301 redirect is a permanent redirection from one URL to another. The “301” is an HTTP status code that tells browsers and search engines that the page has permanently moved to a new location. It’s like changing your home address and having the post office forward all your mail to your new house indefinitely.
Preserving Your SEO Equity
This is arguably the most critical function of a 301 redirect. When search engines like Google encounter a 301 redirect, they understand that the old page’s authority, or “link equity,” should be passed to the new page. Without this, all the hard-earned backlinks, ranking signals, and historical SEO value associated with your old URLs would be lost, causing a significant drop in search rankings and organic traffic. By implementing 301s, you signal to Google that the new URL is the definitive version of the content, allowing your site to retain its hard-won visibility.
Enhancing User Experience (UX)
Imagine a user clicks on an old link to your site from an external website, a social media post, or even a bookmark. If no redirect is in place, they’ll land on a dreaded 404 “Page Not Found” error. This is frustrating for users and reflects poorly on your brand. A 301 redirect ensures that visitors are seamlessly guided to the correct, updated page, providing a fluid and positive browsing experience.
Preventing Broken Links and Crawl Errors
During a site migration, it’s inevitable that many internal and external links pointing to your old URLs will exist. Without redirects, these become broken links, contributing to a poor site reputation in the eyes of search engines. Google Search Console will report these as “crawl errors,” indicating problems with your site’s accessibility. Proactive use of 301 redirects minimizes these errors, helping search engine crawlers efficiently navigate and index your new Wix site.
Wix’s Intuitive 301 Redirect Manager
One of the many strengths of the Wix platform is its commitment to simplifying complex web management tasks. While setting up 301 redirects traditionally might involve editing server configuration files like .htaccess (a task often intimidating for non-developers), Wix provides a clear, graphical user interface (GUI) that makes the process accessible to everyone. This built-in tool is particularly beneficial for small to medium-sized websites, offering an efficient way to manage individual redirects without needing extensive technical knowledge.
Now, let’s get into the practical steps of setting up these crucial redirects within your Wix dashboard.
Step-by-Step Guide: Implementing 301 Redirects on Your Wix Website
Here’s a detailed walkthrough to ensure you correctly set up URL forwards on your Wix site, safeguarding your SEO and user experience.
1. Log In to Your Wix Dashboard and Select Your Site
Your journey begins by accessing your Wix account. Navigate to the Wix login page and securely enter your credentials. If you manage multiple websites under your Wix account, ensure you select the specific site for which you intend to add redirects from your dashboard’s site list. This guarantees you’re working on the correct project.
2. Navigate to “Manage Website”
Once you’re in the dashboard of your chosen site, direct your attention to the left-hand navigation column. You’ll find a series of options related to your site’s administration. Click on the option labeled “Manage Website” (or sometimes simply “Site Actions” leading to similar options). This section is your control panel for various site-level settings and tools.
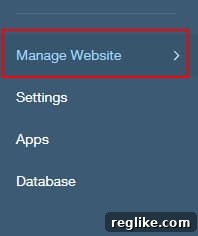
(Image: Screenshot illustrating where to find “Manage Website” in the Wix dashboard’s left menu.)
3. Click on “SEO” (SEO Tools)
Within the “Manage Website” submenu, you’ll see several categories. Look for and click on “SEO” (or “SEO Tools”). This section houses all the features related to your site’s search engine optimization, including vital tools like sitemap management, Google Search Console integration, and of course, URL redirects.

(Image: Screenshot pointing to the “SEO” option within the Wix site management menu.)
4. Scroll Down to “Manage 301 Redirects”
Once you’re in the SEO section, you might need to scroll down a bit. Wix organizes its SEO features logically, and the 301 Redirect Manager is a dedicated tool. Locate the heading or option explicitly labeled “Manage 301 Redirects.” This is the gateway to configuring your URL forwarding rules.
5. Insert Old URLs and Map Them to New Pages
This is the core of the redirect process. The “Manage 301 Redirects” interface is designed for clarity:
- Old URL (Left Box): In the input field on the left, you will enter the path of your old page after your top-level domain. For example, if your old URL was
https://www.yourdomain.com/old-page-name, you would only enter/old-page-nameinto this box. Do not include your domain (yourdomain.com) or thehttps://wwwprefix. - New URL (Right Dropdown/Manual Entry): On the right side, you need to specify where the old URL should now point.
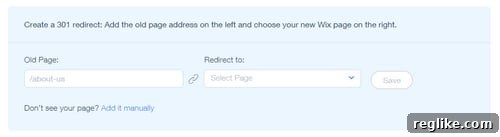
(Image: Screenshot demonstrating the input fields for Old URL and the New URL dropdown.)
Handling Pages Not in the Dropdown (Dynamic Pages or External Links)
There might be instances where the target page on your new Wix site doesn’t appear in the dropdown box. This is common for dynamically generated pages (like certain blog posts or product pages that follow a template structure) or if you want to redirect to an external URL. In such cases:
- Click on the “Add it Manually” option.
- A new input box will appear. Here, you should paste the full, absolute URL of the new page hosted on Wix (e.g.,
https://www.yourdomain.com/new-page-name).
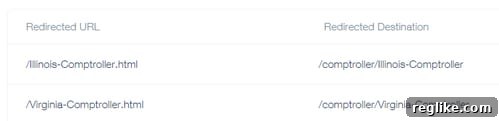
(Image: Screenshot showing the “Add it Manually” option and the field for pasting the full URL.)
After entering each redirect pair, make sure to save your changes. Wix typically provides an “Add” or “Save” button to confirm each redirect rule.
Best Practices for Effective 301 Redirect Management on Wix
Simply adding redirects isn’t enough; strategic management ensures optimal results:
Audit Your Old URLs Thoroughly
Before you even start adding redirects, you need a comprehensive list of all your old URLs. Utilize tools like Google Search Console (under “Index Coverage” and “Crawl Errors”), website crawlers (e.g., Screaming Frog, Semrush Site Audit), or your old site’s analytics data to identify high-traffic and frequently linked pages that absolutely require redirection.
Prioritize Critical Pages
If you have hundreds of pages, start with your most important ones: your homepage, high-ranking landing pages, popular blog posts, and core service/product pages. These are the pages that generate the most traffic and link equity.
Maintain a Redirect Map
Keep a spreadsheet documenting every old URL and its corresponding new URL. This “redirect map” will be invaluable for auditing, troubleshooting, and future reference. It helps prevent errors and ensures no critical pages are missed.
Test Your Redirects Diligently
After setting up redirects, test them. Open an incognito browser window and manually type or paste some of your old URLs to confirm they redirect correctly to the new pages. You can also use online 301 redirect checkers to verify the redirect chain (ensuring it’s a direct 301 and not a longer chain).
Monitor Google Search Console
Post-migration, regularly check the “Index Coverage” and “Crawl Errors” reports in Google Search Console for your new Wix site. This will help you identify any remaining 404 errors or other indexing issues that might indicate missed redirects or misconfigurations.
Avoid Redirect Chains
A redirect chain occurs when Old URL A redirects to URL B, which then redirects to URL C. This is inefficient for both user experience and SEO, as it slows down page loading and can dilute link equity. Always aim for direct redirects: Old URL A → New URL C.
Consider Wildcard Redirects (if available/needed)
For large sites with consistent URL structure changes (e.g., /blog/category/post-name to /new-blog/post-name), wildcard redirects (using *) can save immense time. While Wix’s manual tool is per-page, explore if Wix offers advanced options for bulk redirects or regular expressions for specific use cases.
Common Troubleshooting Tips for Wix Redirects
Even with careful planning, issues can arise. Here’s how to address some common problems:
- Redirect Not Working: Double-check for typos in both the old and new URL paths. Ensure you saved the redirect rule. Clear your browser cache or try an incognito window, as browser caching can sometimes prevent you from seeing the updated redirect.
- Redirect Loop: This happens when URL A redirects to B, and B redirects back to A, creating an endless cycle. Review your redirect map for conflicting rules and ensure each old URL points to a unique, final new destination.
- Wrong Destination Page: Verify that the new URL you entered or selected is precisely the correct target page.
- “Page Not Found” After Redirect: If the redirect works but leads to a 404 on the new site, it means the new page itself either doesn’t exist or its URL is incorrect. Check your Wix site’s page settings and ensure the new URL is live and accurate.
- Wix Editor Changes: Remember that changes made in the Wix editor (e.g., renaming a page) will automatically update its URL within Wix. Ensure your redirects account for any such changes.
Conclusion: A Smooth Transition with Wix 301 Redirects
Moving a website is a significant undertaking, and protecting your SEO investment is paramount. Wix’s intuitive 301 redirect tool empowers you to manage this critical aspect with relative ease, even if you’re not a seasoned developer. By diligently mapping your old URLs to their new destinations on your Wix site, you prevent frustrating 404 errors for your users and, crucially, signal to search engines that your content has simply found a new home, allowing its hard-earned authority to transition seamlessly.
Embrace the power of 301 redirects as a foundational element of any successful website migration. By following the steps outlined in this guide and adhering to best practices, you can ensure your transition to Wix is not just visually appealing, but also robustly optimized for continued search engine visibility and an excellent user experience. Start leveraging Wix’s capabilities today to secure your site’s future performance!