
Elevate Your BlueSky Identity: Seamlessly Integrate Your Custom Domain as Your Handle
In the rapidly evolving landscape of social media, establishing a unique and memorable online identity is paramount. While traditional platforms often confine users to generic usernames, a new wave of decentralized social networks like BlueSky is empowering individuals with unprecedented control over their digital presence. One of the most exciting and user-centric features of BlueSky is the ability to use your very own domain name as your handle, transforming a mundane username into a powerful statement of personal branding and ownership. This comprehensive guide will walk you through the incredibly straightforward process of changing your BlueSky handle to your custom domain, requiring nothing more complex than adding a simple TXT record to your domain’s DNS settings.
The Dawn of Decentralized Identity: Why Your Domain Matters
The digital world is experiencing a significant shift away from centralized platforms where a single entity controls your identity and data. Newer social media paradigms, particularly those built on decentralized protocols, are offering users more autonomy. Mastodon, for example, pioneered a model where users choose a server, each typically represented by a unique domain name. Many of these instances leverage modern domain extensions like .social, fostering diverse communities and identities.
BlueSky takes this concept a step further by allowing your domain name to directly serve as your handle. This isn’t just a cosmetic change; it’s a fundamental enhancement to how you represent yourself online. Instead of a generic identifier such as yourname.bsky.social, you can proudly display yourdomain.com, instantly recognizable and deeply personal. This feature resonates strongly with the spirit of personal branding, giving individuals and businesses alike a consistent, professional, and easily discoverable identity across the web.
Imagine the convenience and prestige of having your BlueSky profile directly linked to your established web presence. It simplifies discoverability, reinforces your brand, and provides a sense of permanence that is often lacking in the transient world of social media usernames. This guide will demonstrate just how simple it is to make this powerful transition, ensuring your BlueSky identity is truly yours.
Advantages of Using Your Custom Domain as a BlueSky Handle
Before diving into the technical steps, let’s explore why this feature is such a game-changer for your online presence:
- Enhanced Personal Branding: Your domain name is often the cornerstone of your online brand. Using it as your BlueSky handle creates seamless brand consistency across all your digital touchpoints, from your website to your social media.
- Increased Memorability and Discoverability: A custom domain handle is typically much easier to remember and share than a generic platform-specific username. This makes it simpler for others to find and follow you, boosting your visibility.
- Professionalism and Credibility: A custom domain conveys a sense of professionalism and seriousness, signaling that you are an established entity with a cohesive online presence.
- True Ownership and Control: Unlike platform-assigned usernames, you own your domain name. This means your identity on BlueSky is tethered to something you control, providing a layer of permanence and independence from the platform itself.
- Future-Proofing Your Identity: Should BlueSky evolve or if you decide to pivot your online strategy, your domain-based identity remains consistent. It’s an anchor that transcends individual platforms.
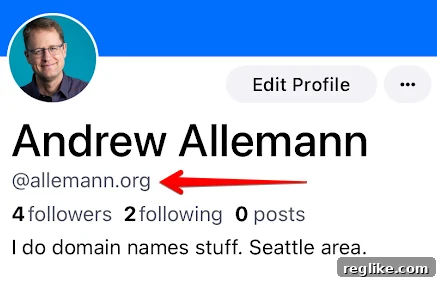
The process is surprisingly intuitive, designed to be accessible even to those with minimal technical expertise. I recently made this change myself, moving from a standard allemann.bsky.social handle to allemann.org, and can attest to its simplicity. Here’s a detailed, step-by-step walkthrough for how you can achieve the same with any domain you own:
Prerequisites for Changing Your BlueSky Handle
Before you begin, ensure you have the following:
- An active BlueSky account.
- A registered domain name that you own and have full administrative access to its DNS settings. This means you should know how to log in to your domain registrar (e.g., GoDaddy, Namecheap, Cloudflare, etc.) or DNS provider.
Step-by-Step Guide: Changing Your BlueSky Handle to Your Custom Domain
Step 1: Access Your BlueSky Settings
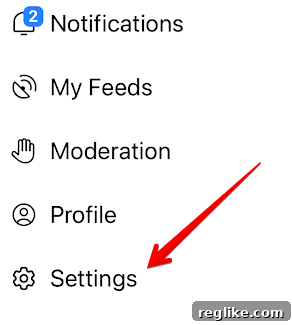
The journey begins within the BlueSky application itself. Open the BlueSky app on your device or access it via the web. You’ll need to locate the main menu, which is typically found on the left-hand side of the interface. Within this menu, look for and click on the “Settings” option. This is your gateway to managing various aspects of your BlueSky profile and preferences.
Step 2: Navigate to the “Change Handle” Option
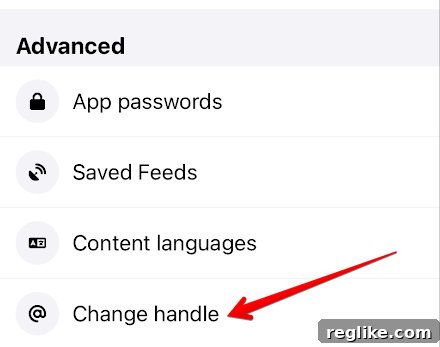
Once you’re in the Settings menu, you’ll see a list of various configuration options. Scroll down until you find the “Advanced” section. This section usually contains more specialized settings, and among them, you will find the “Change handle” option. Tap or click on this to proceed. This is the crucial step that initiates the handle modification process.
Step 3: Select “I have my own domain”
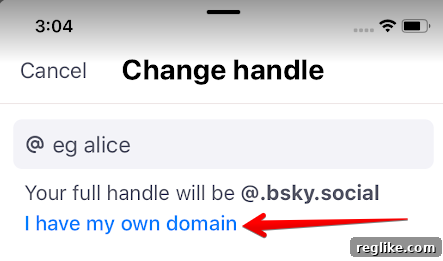
Upon clicking “Change handle,” BlueSky will present you with options for modifying your handle. To use your custom domain, you need to explicitly tell BlueSky that you own a domain you wish to use. Look for and tap on the option clearly labeled “I have my own domain.” This selection signals your intention to link your BlueSky identity to your personal domain name.
Step 4: Enter Your Domain and Copy the Verification Value
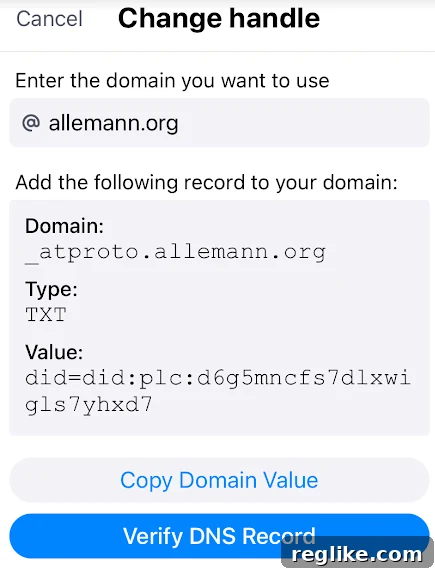
Now, BlueSky will prompt you to enter the domain name you wish to use as your handle. Type your full domain name (e.g., yourdomain.com, yourblog.net, etc.) into the designated field. After you enter your domain, BlueSky will automatically generate a unique “Value” string. This string is a critical piece of information that you’ll need for the next step. It’s part of a TXT record that BlueSky uses to verify that you indeed own and control the domain you’re trying to link. Make sure to carefully copy this entire “Value” string to your clipboard, as you will need it precisely for the DNS configuration.
Step 5: Access Your Domain Registrar’s DNS Settings
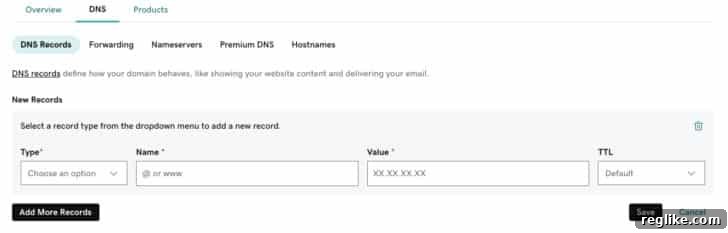
This step requires you to leave the BlueSky app temporarily and log in to your domain registrar’s website. A domain registrar is the company through which you purchased and registered your domain name (e.g., GoDaddy, Namecheap, Cloudflare, Google Domains, etc.). Once logged in, navigate to the management area for your specific domain. Within this management area, you’ll need to find the section dedicated to DNS (Domain Name System) records. This section is often labeled “DNS Management,” “Manage DNS,” “DNS Records,” or similar. The exact interface will vary depending on your registrar, but the core functionality remains the same: adding or modifying DNS records. For illustrative purposes, here’s how this section might appear within GoDaddy’s interface:
Step 6: Add the TXT Record for BlueSky Verification
Once you are in your domain’s DNS management section, you will need to add a new record. This specific record is a TXT (Text) record, which is commonly used for various verification purposes. Here’s how to configure it:
- Type: Select “TXT” from the dropdown list of record types.
- Name/Host: For the “Name” or “Host” field, you must enter
_atproto.(including the underscore and the trailing dot). This specific prefix is what BlueSky’s AT Protocol uses to identify the verification record. - Value/Content: In the “Value” or “Content” field, paste the unique string you copied from BlueSky in Step 4. Ensure there are no extra spaces or characters before or after the copied string.
- TTL (Time To Live): Some registrars allow you to set the TTL. This determines how long DNS resolvers cache the record. For faster verification, you might set a shorter TTL (e.g., 600 seconds or 1 hour), but the default setting is usually fine.
After entering all the details, make sure to save the new TXT record. This action will publish the record to the global DNS system, making it discoverable by BlueSky’s verification servers.
Step 7: Verify DNS Record in BlueSky
With the TXT record added and saved at your domain registrar, return to the BlueSky application. On the screen where you copied the “Value” in Step 4, you will now see a button labeled “Verify DNS Record” (or similar). Click on this button. BlueSky will attempt to query the DNS system for your domain to confirm the presence and correctness of the TXT record you just added. If everything is set up correctly and the DNS record has propagated (which can sometimes take a few minutes to an hour, though often it’s almost instantaneous), BlueSky will successfully verify your domain.
If you encounter an error, double-check the TXT record details at your registrar (especially the “Name” and “Value” fields) and ensure you’ve saved the changes. Sometimes, simply waiting a few more minutes for DNS propagation can resolve the issue.
That’s it! Once verified, your BlueSky handle will instantly update to your chosen domain name. Now, your profile will proudly display your custom handle, reflecting your personal or professional brand.
Your New BlueSky Identity: What to Expect
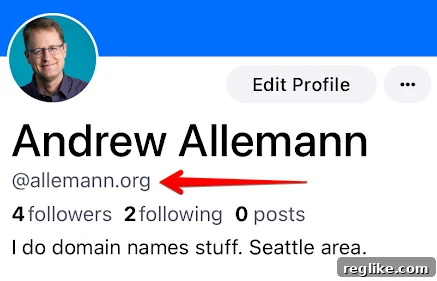
After successful verification, your BlueSky profile will immediately reflect your new custom domain handle. This means that instead of a generic name.bsky.social, your handle will appear as @yourdomain.com. This transformation provides a more polished, memorable, and professional identity on the platform. Other users will now be able to find and follow you using your familiar domain name, reinforcing your brand and making your presence more distinctive. My profile, for example, now looks like this:
Conclusion: Embrace Your Custom Domain on BlueSky
The ability to use your own domain name as your BlueSky handle is a testament to the platform’s commitment to user control and decentralized identity. It’s a powerful feature that elevates your social media presence beyond a mere username, transforming it into an integral part of your overarching digital brand. The process, as outlined above, is remarkably simple, involving just a few clicks within BlueSky and a quick DNS record addition at your domain registrar.
While the future of new social media platforms like BlueSky is always an evolving story, features like this underscore a significant shift towards user empowerment. By adopting your custom domain as your handle, you’re not just changing a username; you’re staking a claim to a more robust, persistent, and personally branded online identity. Take advantage of this fantastic feature to solidify your presence and make your mark on the decentralized web.
If you’re on BlueSky and found this guide helpful, be sure to connect with me @allemann.org!