
Effortlessly Verify Domain Ownership on Dan.com: A Comprehensive Guide
Are you a domain investor or seller utilizing Dan.com as your primary platform for listing and selling domain names? If so, you’ve likely encountered the occasional frustration of having a domain listing rejected. This often occurs when the domain was previously associated with another user’s account on Dan.com before you acquired it. Manually contacting Dan.com support to rectify these rejections can be time-consuming and detract from your overall efficiency. Fortunately, there’s a streamlined solution: leveraging a third nameserver for automatic ownership verification.
Why Domain Ownership Verification Matters on Dan.com
Dan.com prioritizes security and aims to ensure that only rightful owners can list and sell domain names on their platform. This verification process is crucial to prevent fraudulent activity and maintain the integrity of the domain marketplace. When a domain is added to Dan.com, the system checks for existing associations with other accounts. If a conflict arises, manual intervention from the support team is typically required to confirm ownership and approve the listing.
However, relying solely on manual verification can lead to delays and hinder your ability to quickly list and sell your domains. This is where the third nameserver method comes into play. By adding a unique nameserver provided by Dan.com to your domain’s DNS settings, you can automatically verify your ownership and bypass the manual verification process, significantly accelerating your domain listing process.
The Power of the Third Nameserver: A Step-by-Step Guide
The third nameserver approach provides a direct and efficient way to prove your control over a domain, eliminating potential conflicts and streamlining your domain management workflow on Dan.com. Here’s a detailed guide on how to implement this solution:
- Access Your Dan.com Account Settings: Begin by logging into your Dan.com account and navigating to the “Settings” section. This area typically contains various configuration options related to your account preferences and security settings.
- Locate the “Ownership” Section: Within the settings menu, find the “Ownership” or “Account Verification” section. The exact wording may vary slightly, but it should be relatively straightforward to identify. This section is specifically designed to manage and verify your domain ownership on the platform.
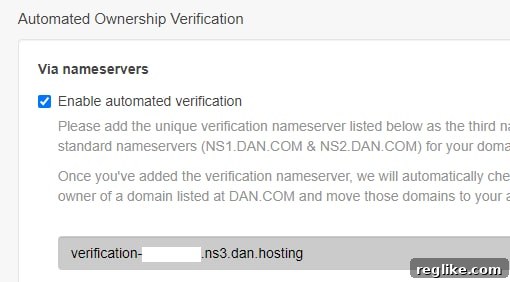
- Enable Account Verification: Within the “Ownership” section, you should find an option to enable account verification. This is often represented as a toggle switch or a checkbox. Activating this option initiates the process of utilizing the third nameserver for automatic verification.
- Retrieve Your Unique Nameserver: Once account verification is enabled, Dan.com will provide you with a unique nameserver specifically assigned to your account. This nameserver is crucial for the verification process, so make sure to copy it accurately. This nameserver will typically follow the format of `ns*.dan.com`.
- Add the Nameserver to Your Domain’s DNS Settings: This is the most critical step. You’ll need to access your domain registrar’s control panel or DNS management interface. Locate the section where you can manage your domain’s nameservers. Alongside your existing primary and secondary nameservers, add the unique nameserver provided by Dan.com as your third nameserver.
Important Note: The process of adding nameservers can vary slightly depending on your domain registrar. However, the general principle remains the same: you need to add the Dan.com-provided nameserver to your domain’s DNS records.
- Wait for Propagation: After adding the third nameserver, it takes time for the changes to propagate across the internet. This propagation process can typically take anywhere from a few minutes to 48 hours, although it usually resolves much faster. During this time, Dan.com will be checking for the presence of the third nameserver to verify your ownership.
- Enjoy Seamless Domain Verification: Once the DNS propagation is complete, Dan.com will automatically recognize the third nameserver and verify your ownership of the domain. This means that subsequent attempts to list the domain on your Dan.com account should be automatically approved, bypassing the manual verification process and saving you valuable time.
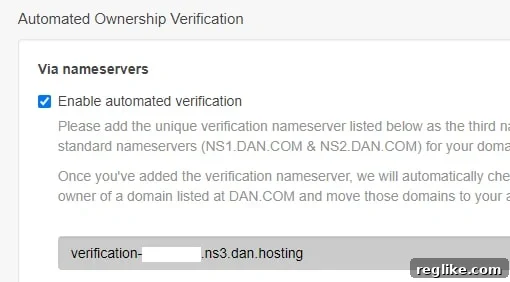
Access the Ownership settings in your Dan.com account to enable verification.
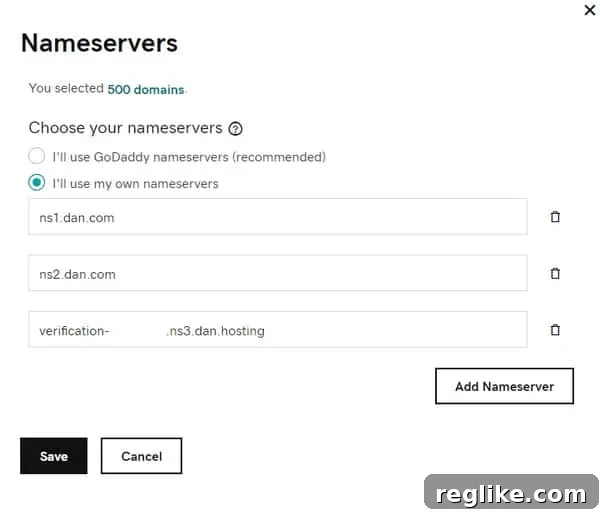
Add the unique nameserver as your third nameserver in your domain’s DNS settings.
Benefits of Using a Third Nameserver for Domain Verification
Employing the third nameserver method for domain verification on Dan.com offers numerous advantages, making it a worthwhile practice for any serious domain investor or seller:
- Eliminates Domain Rejections: The most significant benefit is the elimination of domain rejections caused by previous associations with other accounts. This ensures that your domain listings are approved quickly and efficiently.
- Saves Time and Effort: Bypassing the manual verification process saves you considerable time and effort, allowing you to focus on more important aspects of your domain business, such as acquiring new domains or optimizing your sales strategy.
- Streamlines Domain Management: The third nameserver method simplifies your overall domain management workflow on Dan.com, making it easier to add, manage, and sell your domains.
- Improves Efficiency: By automating the domain verification process, you can improve your overall efficiency and reduce the amount of time spent dealing with administrative tasks.
- Enhances Security: While primarily used for verification, the third nameserver also adds an extra layer of security by confirming your control over the domain.
Troubleshooting Common Issues
While the third nameserver method is generally reliable, you might encounter occasional issues. Here are some common troubleshooting tips:
- DNS Propagation Delays: As mentioned earlier, DNS propagation can take time. If you’re still experiencing rejections after adding the nameserver, wait a full 48 hours before contacting Dan.com support.
- Incorrect Nameserver Entry: Double-check that you’ve entered the unique nameserver provided by Dan.com correctly in your domain’s DNS settings. Even a small typo can prevent the verification process from working.
- Conflicting DNS Records: In rare cases, conflicting DNS records might interfere with the verification process. Consult with your domain registrar’s support team to ensure that there are no conflicting records that could be causing the issue.
- Dan.com System Issues: Although uncommon, there might be temporary system issues on Dan.com’s end. If you’ve followed all the steps correctly and are still experiencing problems, contact Dan.com support for assistance.
Conclusion: Embrace the Third Nameserver for Efficient Domain Management
Verifying domain ownership on Dan.com is crucial for a smooth and efficient domain selling experience. While manual verification is an option, the third nameserver method offers a significantly faster, more reliable, and less cumbersome approach. By following the steps outlined in this guide, you can effortlessly verify your domain ownership, eliminate domain rejections, and streamline your domain management workflow on Dan.com. Embrace this powerful technique and unlock the full potential of your domain investment strategy.
Take control of your domain portfolio today by implementing the third nameserver verification method. Enjoy a smoother, more efficient, and ultimately more profitable domain selling experience on Dan.com!