
Are you looking to transform your existing WordPress website into a fully functional online store? The journey to launching an eCommerce presence might seem daunting, but with the right tools, it can be surprisingly straightforward, affordable, and incredibly rewarding. Enter WooCommerce, the premier eCommerce solution that seamlessly integrates with WordPress, empowering millions of businesses worldwide.
WooCommerce stands out as one of the most popular and robust free eCommerce solutions available today. Its widespread adoption is a testament to its user-friendliness, extensive out-of-the-box functionality, and the vast ecosystem of free and premium extensions designed to elevate any online store, regardless of its size or niche. If you’ve cultivated a loyal audience with compelling content on your WordPress site, it’s time to leverage that following by offering products and services, thereby turning your passion into a revenue stream.
This comprehensive guide will walk you through the entire process of converting your established WordPress domain into a dynamic, revenue-generating eCommerce shop using the powerful WooCommerce platform. We’ll cover everything from installation to configuring essential store settings, ensuring you have a clear roadmap to launch your online venture with confidence.
Unlock Your eCommerce Potential: Why WooCommerce is the Right Choice

Powering over 28% of all online shops, WooCommerce has solidified its position as a leading eCommerce platform. Its appeal lies in its powerful feature set combined with an accessible, affordable model, making it the go-to choice for WordPress users aiming to establish an online store quickly and efficiently. Beyond its ease of integration, WooCommerce offers an impressive visual appeal and a rich array of built-in functionalities designed to give you unparalleled control over every facet of your online business.
Whether you plan to sell physical goods, offer digital downloads, or manage virtual products and services, WooCommerce handles it all with remarkable ease. Its open-source nature means boundless extensibility, allowing you to customize and scale your store to meet evolving business needs. Furthermore, it boasts extensive documentation, an active community forum, and a dedicated support team for premium extensions, ensuring you’re never alone when encountering glitches or security concerns. Choosing WooCommerce isn’t just about setting up a store; it’s about investing in a scalable, flexible, and future-proof eCommerce solution.
Key Advantages of Building Your Store with WooCommerce:
- Cost-Effective: The core WooCommerce plugin is free, making it an incredibly budget-friendly option for startups and small businesses.
- Unrivaled Flexibility: Sell any type of product – physical, digital, virtual, grouped, or affiliate products. Manage inventory, taxes, and shipping with advanced features.
- Seamless WordPress Integration: As a WordPress plugin, WooCommerce feels native to your site, leveraging your existing content and user base.
- Extensive Customization: With thousands of themes and extensions, you can tailor your store’s appearance and functionality to precisely match your brand.
- SEO Friendly: Built with SEO best practices in mind, WooCommerce helps your products rank higher in search engine results.
- Scalability: From a handful of products to thousands, WooCommerce is built to grow with your business without compromising performance.
- Robust Community Support: Benefit from a massive global community, countless tutorials, and professional support options.
Your Step-by-Step Guide to Setting Up WooCommerce on WordPress
Now that you understand the immense value WooCommerce brings, let’s dive into the practical steps of setting up your online store. The process is designed to be intuitive, especially with the assistance of the WooCommerce Setup Wizard.
Step 1: Install and Activate the WooCommerce Plugin
The first action in your eCommerce journey is to get the WooCommerce plugin onto your WordPress site. This is a standard plugin installation process:
- From your WordPress dashboard, navigate to Plugins > Add New.
- In the search bar, type “WooCommerce” and press Enter.
- Locate the official “WooCommerce” plugin by Automattic (the same company behind WordPress.com).
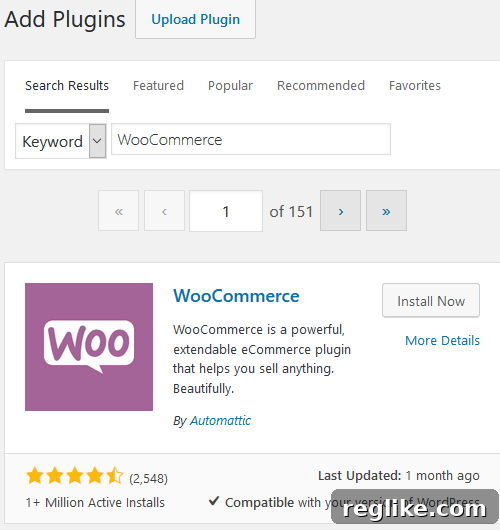
- Click the Install Now button.
- Once installed, the button will change to Activate. Click it to activate the plugin.
Congratulations! WooCommerce is now installed on your WordPress website. This simple step unlocks a world of eCommerce possibilities, setting the stage for your online shop.
Step 2: Utilize the WooCommerce Setup Wizard for a Quick Start
Immediately after activating WooCommerce, you’ll be prompted to use its incredibly helpful Setup Wizard. This wizard is designed to guide you through the initial configuration steps quickly and painlessly, ensuring all foundational aspects of your store are correctly established. It’s highly recommended to use this wizard to streamline the setup process and avoid potential misconfigurations.
Click on Let’s Go to begin the wizard. You’ll be led through a series of prompts that cover crucial settings for your store.
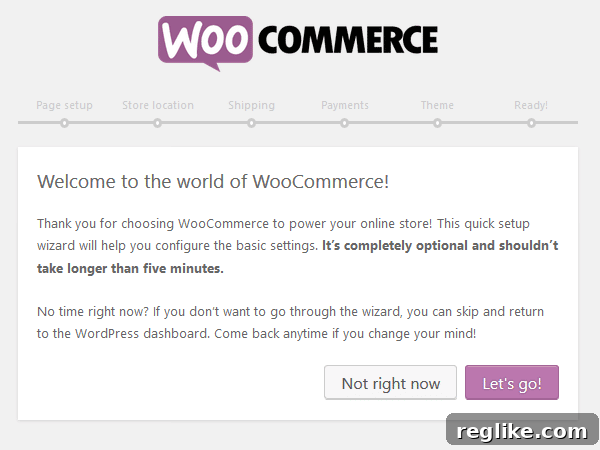
Following each step of the Setup Wizard will systematically configure your WooCommerce store, laying a solid foundation for your products and customers.
Step 3: Essential Page Setup for Your Online Store
The first critical task the Setup Wizard handles is the automatic creation of essential pages your eCommerce store will need to function properly. These pages are fundamental for customer interaction and order processing.
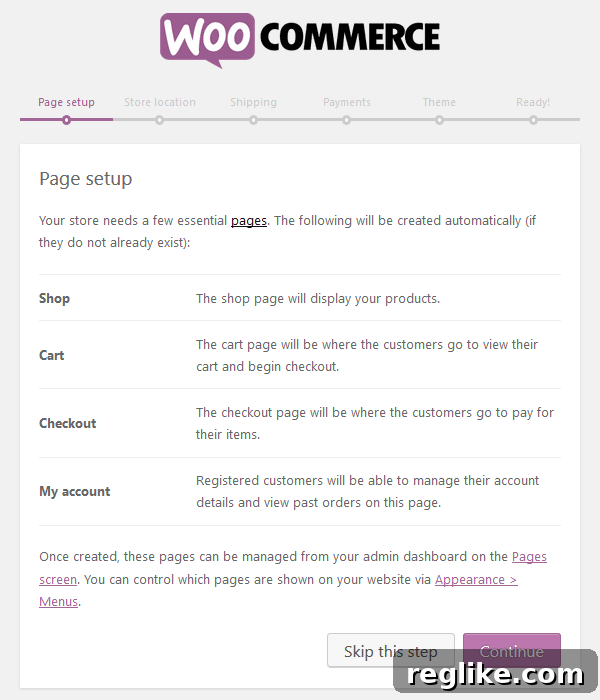
The pages WooCommerce creates are:
- Shop: This is your primary product display page. It’s where customers will browse your inventory, filter products, and discover new items. Think of it as your virtual storefront.
- Cart: The cart page allows customers to review the items they intend to purchase, adjust quantities, apply coupon codes, and begin the checkout process. It’s a crucial checkpoint before finalizing a sale.
- Checkout: This is the final stage of the buying process, where customers enter their shipping and billing information, choose a payment method, and complete their purchase transaction securely.
- My Account: Registered users can manage their account details here, including viewing past orders, updating addresses, changing passwords, and accessing digital downloads if applicable. This page enhances customer experience and retention.
Click on Continue to have these vital pages automatically generated and published on your website. While they are fully functional upon creation, you retain complete control and can make any necessary design or content adjustments later by navigating to the Pages section in your WordPress dashboard.
Step 4: Defining Your Store’s Location and Currency Settings
The next step in the Setup Wizard is crucial for localized operations, involving your store’s physical base, currency, and tax configurations. Accurate configuration here ensures compliance and proper financial transactions.
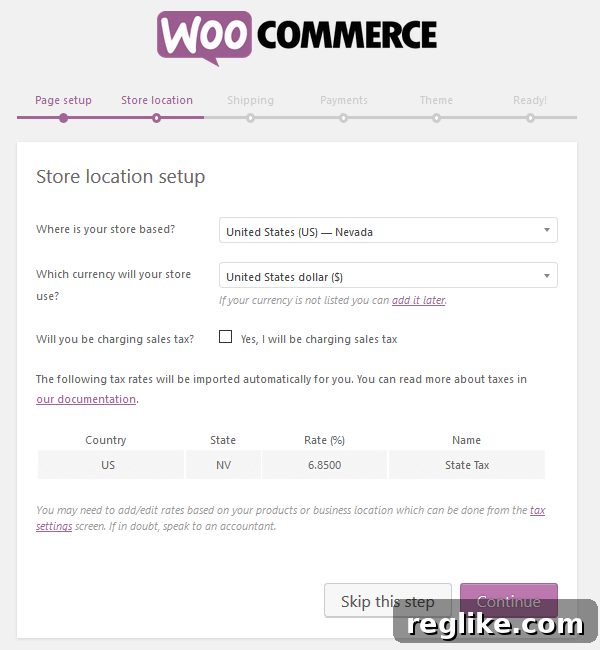
You will need to:
- Choose Your Store’s Base Location: Select the country and region where your business is primarily located. This choice impacts default tax settings and shipping zones.
- Select Your Operating Currency: Determine the currency your online store will use for all transactions and product pricing. WooCommerce supports a wide array of global currencies.
- Configure Sales Tax: Decide whether your store will charge sales tax. WooCommerce offers robust tax options, including automatic tax calculations based on location. You can also specify if product prices already include tax or if tax will be added at checkout.
Based on the locale information you provide, WooCommerce can automatically import relevant tax rates (e.g., state sales tax in the United States) into your shop’s checkout process. It’s important to remember that while WooCommerce provides powerful tax tools, you may still need to manually review and edit some tax rates. Tax regulations can be complex and vary significantly by product type, customer location, and your specific business model. Consulting with a tax professional is always advisable to ensure full compliance.
Step 5: Configuring Your Shipping Details and Options
Effective shipping management is paramount for any online store. This step allows you to define how products are delivered to your customers.
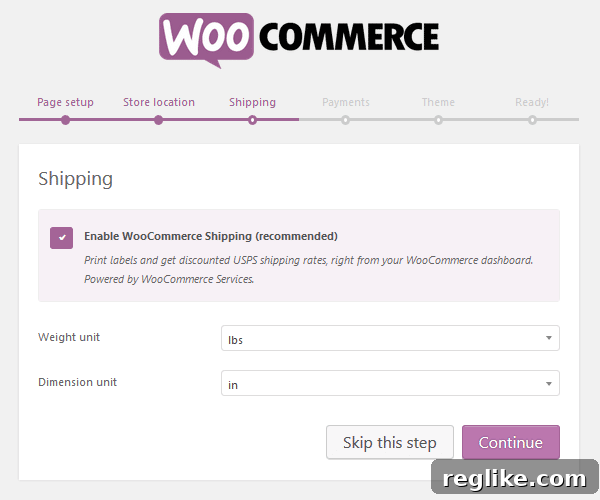
Here, you’ll specify fundamental shipping units:
- Weight Unit: Choose between kilograms (kg) or pounds (lbs). This affects how product weights are calculated for shipping.
- Dimension Unit: Select centimeters (cm) or inches (in). This is used for product dimensions, crucial for calculating shipping costs for certain carriers.
Additionally, you’ll have the option to enable the WooCommerce Shipping feature. This valuable integration allows you to generate and print shipping labels directly from your WordPress dashboard, often with discounted rates from carriers like USPS or Canada Post, streamlining your fulfillment process significantly. Beyond the initial setup, WooCommerce offers advanced shipping zones, shipping classes, and various methods like flat rate, free shipping, or local pickup, which you can configure in detail post-wizard completion.
Step 6: Setting Up Payment Gateways for Seamless Transactions
The ability to securely accept payments is the cornerstone of any successful online business. Without it, even the most beautifully designed store cannot generate revenue. This step guides you through setting up the various payment methods your customers can use.
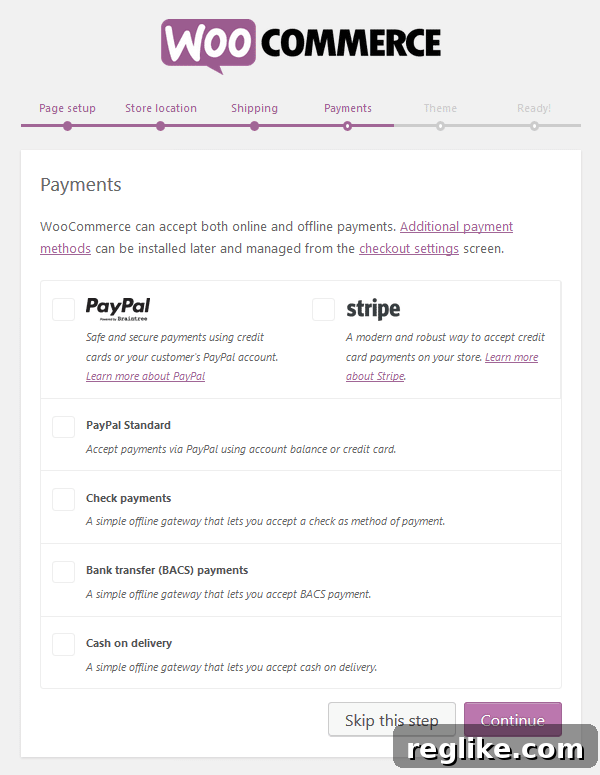
WooCommerce provides multiple options for accepting both online and offline payments, ensuring flexibility for your customers:
- PayPal: A globally recognized and trusted payment gateway, PayPal allows customers to pay securely using their PayPal account balances or linked credit/debit cards.
- Stripe: Another highly popular and developer-friendly payment gateway, Stripe enables you to accept credit and debit card payments directly on your website, offering a smooth checkout experience.
- PayPal Standard: An older but still effective option that directs customers to the PayPal website to complete their transaction, then redirects them back to your store.
- Check Payments: An offline gateway where customers send a physical check. This method requires manual order processing after payment receipt.
- Bank Transfer (BACS): Also an offline method, allowing customers to pay by directly transferring funds from their bank account to yours. You provide your bank details at checkout.
- Cash on Delivery (CoD): Ideal for local deliveries, this method allows customers to pay in cash once they receive their product.
Beyond these standard offerings, WooCommerce boasts a vast marketplace of other payment gateway extensions. These extensions cater to various regional payment preferences, alternative payment methods, and advanced fraud detection. You can easily filter and choose additional payment options based on your target audience and geographical location, ensuring you provide convenient and secure payment choices for all your customers.
Step 7: Selecting the Perfect Theme for Your WooCommerce Store
While your WordPress site might already have a theme, when setting up an online shop with WooCommerce, it’s crucial to use a theme that is fully compatible with the plugin. A WooCommerce-optimized theme ensures that your shop pages—product listings, cart, and checkout—display correctly, function flawlessly, and offer a seamless user experience without requiring custom coding or encountering styling conflicts.
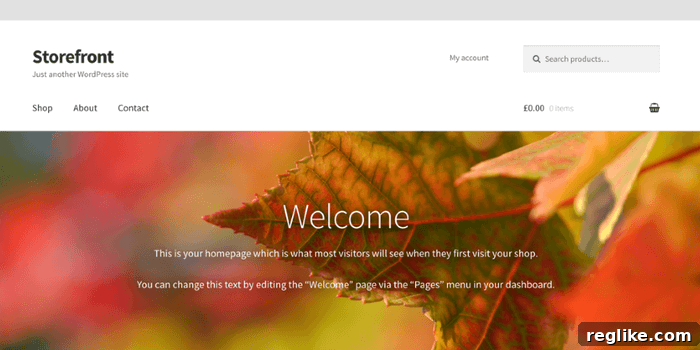
The good news is that the vast majority of modern WordPress themes are built with WooCommerce compatibility in mind, significantly reducing potential styling and functionality issues. During the setup process, you’ll have the option to install and activate Storefront, WooCommerce’s default theme. Storefront is an excellent choice for new stores as it is developed by the same team as WooCommerce, guaranteeing perfect integration and robust performance.
Key features that make Storefront an ideal starting point include:
- Seamless Integration: Designed specifically for WooCommerce and its official extensions, ensuring maximum compatibility.
- Highly Customizable: Offers extensive customization options for design and functionality directly through the WordPress Customizer.
- Child Theme Ready: Provides a solid, stable foundation for developers or users wanting to make advanced customizations via child themes.
- 100% Responsive Design: Guarantees your store looks and functions flawlessly on all devices, from desktops to smartphones.
- Built-in Accessibility: Developed with accessibility best practices to ensure your store is usable by a wider audience.
- Wide Plugin Support: Compatible with all major slider, shortcode, and page builder plugins, enhancing design flexibility.
- SEO Optimized: Engineered to boost your store’s visibility and rankings in search engine results.
Should you decide to switch themes later, you can do so easily from your WordPress dashboard. The market is saturated with thousands of free and premium WooCommerce-compatible themes, each offering unique aesthetics and features. Premium themes, often found on reputable marketplaces like ThemeForest, typically provide more advanced design options, dedicated support, and specialized functionalities that can help your store stand out. When selecting a theme, consider its design, features, reviews, and support to ensure it aligns perfectly with your brand vision and business requirements.
Step 8: Your Store is Ready – Time to Add Products!
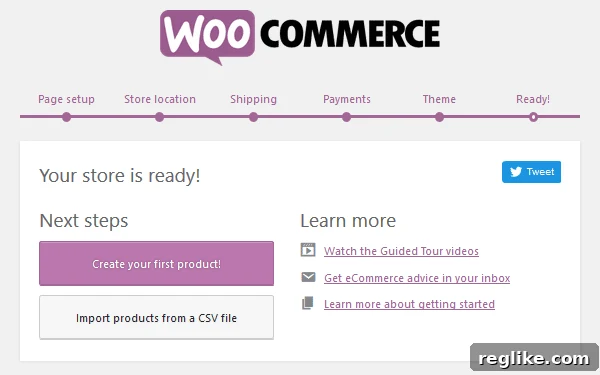
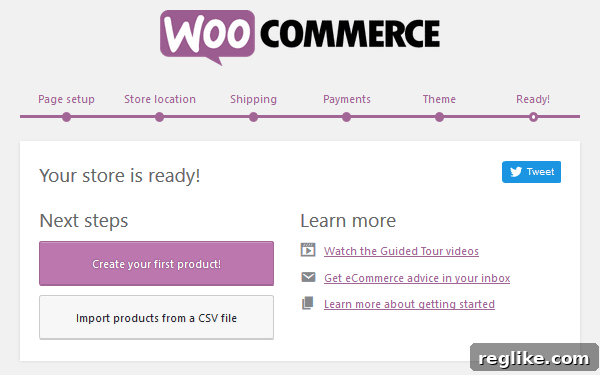
Congratulations! By completing these initial steps through the WooCommerce Setup Wizard, your online store’s foundational configuration is now complete. Your shop is officially set up and ready to go. The most exciting part comes next: populating your store with products.
Adding products is a detailed process that involves defining product types (simple, variable, grouped, external/affiliate), setting prices, managing inventory, creating categories and tags for better organization, adding compelling descriptions, and uploading high-quality images. While beyond the scope of this initial setup guide, WooCommerce provides an intuitive interface in your WordPress dashboard under Products where you can manage every aspect of your product catalog.
Final Thoughts: Launching and Growing Your WooCommerce Store
Transforming an existing WordPress domain into a dynamic eCommerce shop is remarkably straightforward when you leverage the power and simplicity of WooCommerce. The guided Setup Wizard efficiently handles all the essential configurations, allowing you to establish the core functionalities of your store step-by-step with minimal effort.
While setting up WooCommerce is designed to be user-friendly, remember that running a successful online store demands ongoing dedication, strategic planning, and continuous effort. To truly stand out in a competitive online marketplace, you’ll need to focus on product photography, compelling copy, effective marketing, excellent customer service, and potentially delve into advanced WooCommerce features or extensions as your business grows. This journey will undoubtedly involve a learning curve, but it’s an exciting path to explore.
Thankfully, the extensive documentation, the vibrant global community, and the intuitive interface of WooCommerce make the learning process manageable and rewarding. With these resources at your disposal, building the online shop of your dreams – one that resonates with your audience and drives significant revenue – is not just a possibility, but a tangible goal well within your reach. Start small, learn continuously, and watch your WordPress website evolve into a thriving eCommerce powerhouse.