
Securely Grant Limited GoDaddy Access to Your Web Developer for a Single Domain
In the digital age, collaborating with web developers is essential for bringing your online vision to life. However, entrusting your entire domain registrar account to a third party, no matter how reliable, introduces significant security risks. The age-old advice rings true: letting your web developer register a domain on your behalf or providing them with full access to your registrar account is, simply put, a bad idea. This practice can lead to potential issues ranging from unauthorized domain transfers to compromised billing information and even loss of control over your digital assets.
Many domain registrars struggle to offer an intuitive way to grant a developer access to make changes to just one specific domain name. Fortunately, GoDaddy, the world’s largest domain name registrar, does provide a robust solution for delegating limited access, though the process might not be immediately obvious to new users. This comprehensive tutorial will guide you through each step, ensuring you maintain full control over your GoDaddy account while empowering your developer with the precise permissions they need to manage a single domain.
Why Delegate Limited Access? Understanding the Risks and Benefits
Before diving into the “how-to,” it’s crucial to understand why this specific approach to access delegation is not just a convenience, but a critical security measure. When you grant a web developer full access to your GoDaddy account, you’re essentially handing over the keys to your entire domain portfolio, billing details, and personal information. This encompasses all domains under your account, not just the one they’re working on.
The Risks of Full Account Access:
- Unauthorized Domain Transfers: A malicious or negligent developer could potentially initiate transfers of your domains to another registrar or account.
- Exposure of Sensitive Data: Full access often means access to your billing methods, personal contact information, and other sensitive account details.
- Impact on Other Domains: Changes intended for one domain could inadvertently affect others if the developer has unrestricted access.
- Loss of Account Control: In extreme cases, a rogue developer could lock you out of your own account, leading to significant business disruption.
- Compliance Issues: Depending on your industry, granting excessive access might violate data protection and privacy regulations.
The Benefits of Limited, Domain-Specific Access:
- Enhanced Security: By restricting access to only what’s necessary, you drastically reduce your exposure to potential threats. Your main account remains secure.
- Maintain Control: You retain ultimate ownership and control over your domain assets and account settings.
- Clear Boundaries: It establishes professional boundaries, ensuring developers only operate within the scope of their designated tasks.
- Peace of Mind: Knowing that your other domains and sensitive information are protected allows you to focus on your business without constant worry.
- Streamlined Collaboration: Developers get the access they need without you having to constantly mediate changes, fostering efficient workflow.
GoDaddy’s “Delegate Access” feature, combined with its unique folder system, provides the perfect framework for achieving this balance. Let’s walk through the process.
Step-by-Step Guide: Granting Limited GoDaddy Domain Access
This tutorial is broken down into two main phases: first, delegating general account access to your developer, and second, assigning specific domain permissions using GoDaddy’s folder system. Following these steps precisely will ensure your developer can manage the intended domain without compromising your broader account security.
Phase 1: Delegating Account Access
The initial step involves inviting your developer to access your GoDaddy account at a high level, but with strict limitations. This sets the stage for more granular control later.
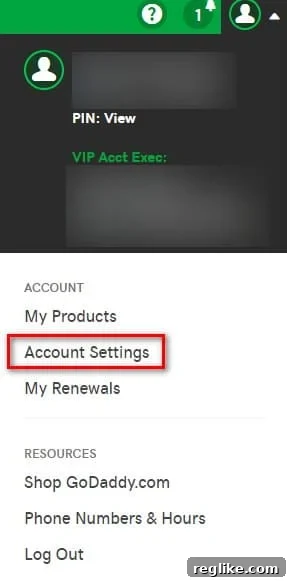
1. Log in to Your GoDaddy Account and Navigate to Account Settings.
Begin by logging into your GoDaddy account using your primary credentials. Once logged in, locate the “person” icon, typically found in the upper right-hand corner of the GoDaddy interface. Clicking this icon will reveal a dropdown menu. From this menu, carefully select “Account Settings.” This section is your central hub for managing all aspects of your GoDaddy account, from personal information to security preferences.
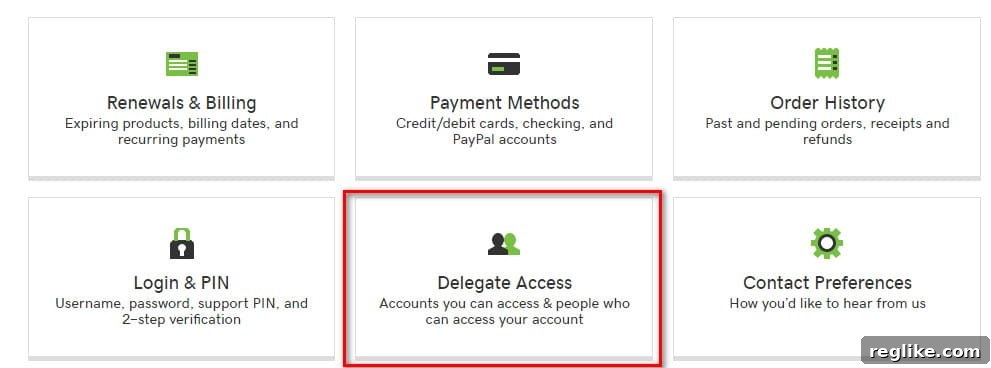
2. Select “Delegate Access” from the Account Settings Menu.
Within the Account Settings dashboard, you will find a list of various options on the left-hand side. Look for and click on the “Delegate Access” option. This section is specifically designed for granting others permission to manage parts of your account without sharing your primary login details. It’s a crucial step towards secure collaboration.
3. Initiate the Invitation Process.
On the “Delegate Access” page, you’ll see a section titled “People who can access my account.” To invite a new developer, move to the right-hand side of this section and click on the prominent “Invite to Access” button. This action will prompt a new dialog box or section to appear, where you can input the details of the person you wish to grant access to.
4. Enter Developer Details and Set Access Level to “Domains Only.”
In the pop-up box that appears, you will need to provide two key pieces of information: the developer’s full name and their email address. It’s imperative that you use the correct email address, as GoDaddy will send the invitation to this address. Crucially, under the “Access Level” option, select “Domains Only.” This is the most vital security setting in this phase. Choosing “Domains Only” ensures that the developer will only be able to manage domain names and related settings, strictly limiting their access to other sensitive areas of your account like billing, hosting, or website builders. This is where the initial layer of security is established.
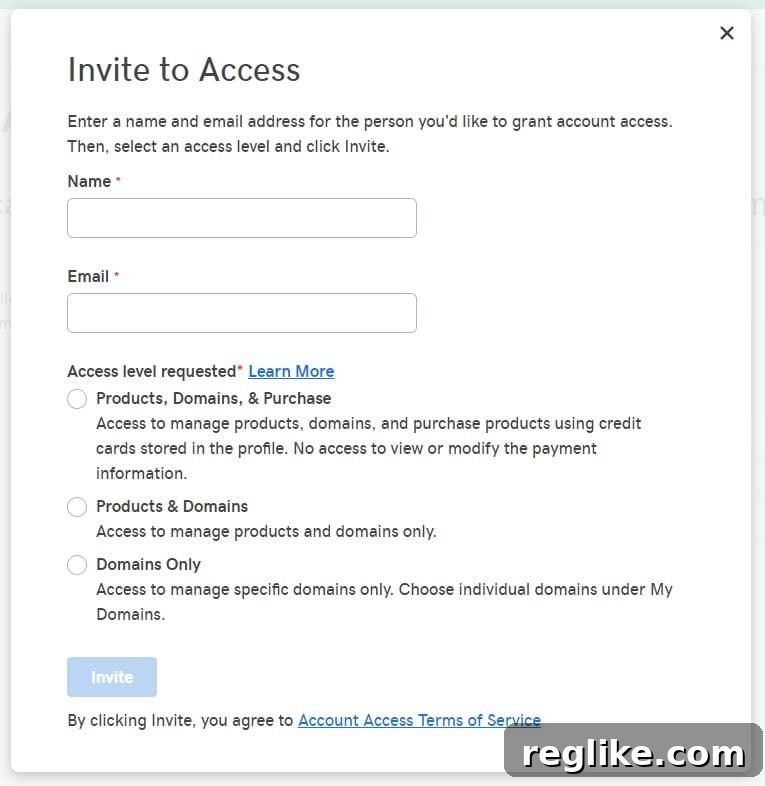
Once you send the invitation, the developer will receive an email from GoDaddy prompting them to accept the delegated access. They will need to create a GoDaddy account (if they don’t already have one) or log in to their existing one to accept. After acceptance, their access will be active, but still broad within the “Domains Only” category. The next phase will narrow this down to a single domain.
Phase 2: Assigning Domain-Specific Permissions
While Phase 1 grants your developer “Domains Only” access, GoDaddy’s unique folder system allows you to refine this further, restricting their control to just one or a select group of domains. This is where GoDaddy truly shines in providing granular control.
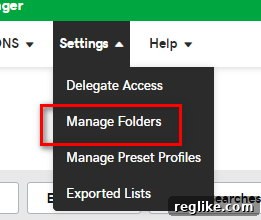
5. Create a New Folder for Your Specific Domain.
Now that you’ve granted the developer general domain access, you need to designate specific domains they can interact with. GoDaddy achieves this through a folder system within your Domain Manager. Navigate to your GoDaddy Domain Manager, where all your domains are listed. Within the Domain Manager interface, look for a “Settings” or “More” dropdown menu. Click on it, and then select “Manage Folders.” This feature allows you to organize your domains and is key to controlling delegate access to individual domains.
6. Configure the New Folder with Developer Access.
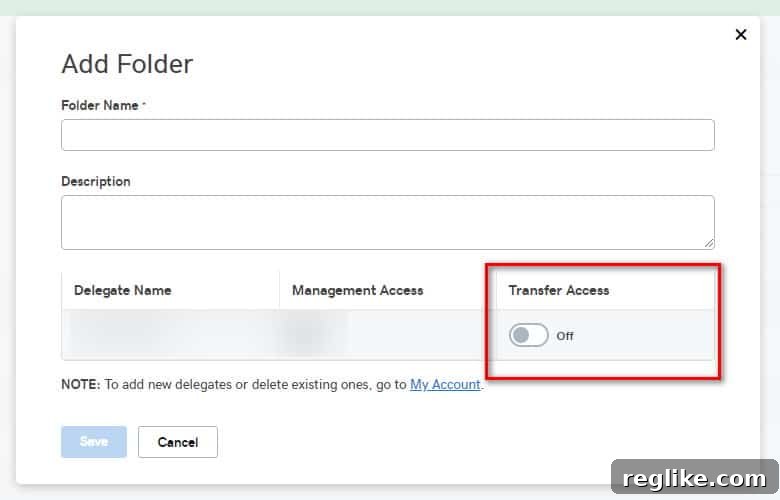
Inside the “Manage Folders” section, click the “Add Folder” button. You will be prompted to create a name for your new folder. Choose a clear, descriptive name that helps you identify its purpose, perhaps related to the project or the specific domain. For example, “Project X Domain” or “[YourDomainName.com] Dev Access.”
Crucially, within this same dialog box, you will find options to configure access for this folder. Ensure you select the checkbox or option that allows the newly invited developer access to this specific folder. You will also see an option regarding domain transfers. For maximum security, it is generally recommended to NOT allow the developer to transfer the domain, unless you have an explicit agreement and full trust. This option gives you another layer of control, preventing unauthorized domain movements.
7. Add the Specific Domain to the Newly Created Folder.
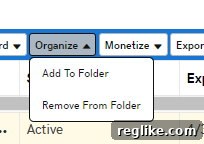
With your secure folder established, the final step is to place the relevant domain inside it. Go back to your main Domain Manager page, where you view all your registered domains. Locate the specific domain your developer needs to work on. Click the checkbox located to the left of that domain name to select it. With the domain selected, look for an “Organize” option or button, often found in a toolbar above your list of domains. Click on “Organize,” and then from the dropdown menu, select “Add to Folder.” A list of your existing folders will appear. Choose the folder you just created and configured for developer access. Once you confirm, the domain will be moved into that folder, and your developer’s “Domains Only” access will now be limited to only the domains within that specific folder. You’re all set!
Best Practices for Secure Collaboration with Developers
While GoDaddy’s delegation features are powerful, implementing a few best practices will further enhance your security posture:
- Regularly Review Access: Periodically check your “Delegate Access” settings to ensure only current collaborators have access, and their permissions are appropriate.
- Remove Access Promptly: As soon as a project is complete or a developer’s services are no longer required, immediately revoke their delegated access.
- Clear Communication: Clearly communicate the scope of the developer’s access and what they are authorized to do. This prevents misunderstandings and unauthorized actions.
- Strong Account Security: Always use strong, unique passwords for your main GoDaddy account, and enable two-factor authentication (2FA) for an additional layer of security.
- Document Changes: If significant changes are made to domain settings by a developer, request documentation or notification of these changes for your records.
Troubleshooting Common Issues
Even with a clear guide, you might encounter minor hurdles. Here are some common issues and their solutions:
- Developer Cannot See the Domain:
- Ensure the developer has accepted the invitation sent to their email.
- Verify that the domain has been correctly added to the folder that the developer has access to.
- Double-check that the “Domains Only” access level was selected in Phase 1.
- Invitation Not Received or Expired:
- Ask the developer to check their spam or junk mail folder.
- GoDaddy invitations typically expire after 48-72 hours. If it’s expired, you’ll need to resend the invitation from the “Delegate Access” page.
- Confirm the email address entered was correct.
- Developer Needs More Permissions (e.g., DNSSEC, Transfers):
- If the developer requires more advanced permissions (e.g., to manage DNSSEC or transfer domains), you will need to edit their access level or the folder settings. Proceed with extreme caution and only if absolutely necessary and with a clear understanding of the risks.
- Confusion Between Account-Level and Domain-Level Delegation:
- Remember, “Domains Only” gives broad domain access. The folder system is critical for narrowing this down to specific domains. Ensure both steps are completed.
Conclusion
Granting limited, domain-specific access to your web developer on GoDaddy is a fundamental practice for maintaining robust security for your online assets. By following this detailed guide, you can empower your collaborators to perform their tasks effectively, without ever compromising the security of your entire GoDaddy account or other valuable domains. This meticulous approach ensures peace of mind, fosters a professional working relationship, and protects your digital investments in an increasingly complex online landscape. Always prioritize security, review permissions regularly, and your collaborative projects will thrive on a foundation of trust and control.