
Master Your Email Monetization: A Step-by-Step Guide to Pointing Domains to Mailbox Park with GoDaddy
In the dynamic world of domain name investing and management, new avenues for monetization are constantly emerging. Beyond traditional web parking, a revolutionary concept allows you to earn from the email traffic your domains receive. This guide delves into Mailbox Park, an innovative service that transforms your domain’s email activity into a passive income stream, and provides a clear, actionable roadmap for integrating it seamlessly using GoDaddy’s powerful DNS management tools.
Understanding Mailbox Park: Your Gateway to Email Monetization
The concept of “email parking” might sound novel, but it offers a clever way to extract additional value from your domain portfolio. Mailbox Park stands out as a pioneering service in this niche, functioning much like a domain parking service, but for your domain’s email. Instead of pointing your domain’s nameservers to a web parking provider, you direct its Mail Exchanger (MX) records to Mailbox Park. Once configured, Mailbox Park monitors the incoming email traffic for your domains and pays you for each legitimate commercial email received.
This innovative approach offers several compelling benefits. Firstly, it provides a passive income stream, allowing you to monetize domains that might otherwise sit idle or generate minimal revenue solely from web traffic. Secondly, it offers fascinating insights into the unseen activity of your domains. Many domain owners are surprised to discover just how much commercial email their dormant or parked domains attract, revealing potential leads or overlooked opportunities. This hidden value can be substantial, transforming previously untapped resources into tangible earnings.
Mailbox Park distinguishes itself from traditional domain parking by focusing exclusively on email traffic. This means you can continue to use your preferred web parking provider for HTTP traffic while simultaneously monetizing your email. The key is to artfully split your domain’s traffic: web requests go to your chosen parking company, and email requests are routed directly to Mailbox Park. This dual-purpose strategy ensures you’re maximizing every aspect of your domain’s potential.
Why GoDaddy DNS Templates Are a Game-Changer for Bulk Operations
For domain investors managing a large portfolio, efficiency is paramount. Manually updating DNS settings for hundreds of domains can be an arduous and time-consuming task. This is where GoDaddy’s DNS Templates tool shines as an indispensable asset. GoDaddy, a leading domain registrar, offers robust DNS management capabilities, and its templating feature is particularly powerful for applying consistent settings across multiple domains with minimal effort.
A DNS template allows you to pre-configure a set of DNS records – such as A records, MX records, CNAME records, and more – and then apply this entire configuration to a batch of domains in one swift operation. This dramatically reduces the potential for errors and significantly cuts down the time required for bulk updates. For the purpose of integrating with Mailbox Park, this means you can set up the necessary MX records and ensure your web traffic continues uninterrupted without having to edit each domain individually. This streamlined process is critical for anyone looking to scale their email monetization efforts effectively and without unnecessary hassle.
The Essential Steps: Directing Your Domains’ Email Traffic to Mailbox Park
The process of directing your domain’s email to Mailbox Park, while maintaining its web functionality, involves a few crucial steps within your GoDaddy account. Follow these instructions carefully to ensure a smooth transition and begin monetizing your domain’s email traffic.
Step 1: Unearthing Your Domain’s Current Web IP Address
To successfully integrate Mailbox Park while keeping your website or existing parking page operational, you need to implement a “split traffic” strategy. This means your web traffic (HTTP/HTTPS) will continue to point to your current parking provider or website, while your email traffic will be redirected to Mailbox Park. To achieve this, you’ll need to identify the specific IP address your web traffic is currently resolving to.
Typically, when domains are parked with a traditional parking company, they use the parking company’s nameservers, which then direct web traffic to their designated IP addresses. Instead of using nameservers for web traffic, we’ll create an A record that points directly to an IP address. This ensures that even after changing nameservers (temporarily) and applying DNS templates, your web content remains accessible.
The easiest way to find this IP address is by using a reliable online Domain-to-IP converter tool. Simply enter one of your parked domain names into such a tool, and it will reveal the IP address associated with it. For many parking providers, especially if you have numerous domains parked with them, they might all share a common IP address. For instance, if you use Uniregistry for parking, you might find that all your domains resolve to the same IP. Confirm this by testing a few domains from your portfolio. Note down this IP address; it will be essential for creating your DNS template.
Domain-to-IP Converter Tool
Step 2: Crafting Your Custom DNS Template in GoDaddy
Now that you have your web traffic IP address, it’s time to build the DNS template within GoDaddy. This template will house all the necessary records for both web and email traffic. Log in to your GoDaddy account and navigate to the Domain Manager. From the main dropdown menu, locate and click on “DNS Templates.”
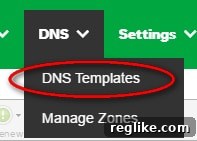
On the DNS Templates page, click the “Add” button to create a new template. You’ll need to configure two primary types of records within this template: an A record for your web traffic and MX records for your email traffic. Here’s what your template configuration should include:
-
A Record: This record directs your domain’s web traffic to a specific IP address.
- Host: Enter
@(which represents the root domain). - Points to: Enter the IP address you identified in Step 1. This ensures your domain’s website or parking page continues to load correctly.
- TTL (Time To Live): Set this to a reasonable value, typically 600 seconds (10 minutes) or 3600 seconds (1 hour). A lower TTL can help changes propagate faster, but might increase DNS query load.
- Host: Enter
-
MX Records: These records are crucial for directing your domain’s email traffic. Mailbox Park will provide unique MX record details for each user or account.
- Priority: MX records are processed in order of their priority value (lower numbers are higher priority). Mailbox Park will specify the priorities for its records.
- Host: Enter
@for the root domain. - Points to: Enter the specific Mailbox Park mail server address(es) provided in your Mailbox Park account.
- TTL (Time To Live): Similar to A records, set a suitable TTL.
IMPORTANT UPDATE: It is crucial to understand that Mailbox Park assigns unique MX addresses to each user or account. Do NOT use generic MX records found online or from the original screenshot if it provides specific values. You MUST log into your Mailbox Park account and retrieve the precise MX record details they provide for your domains. These will typically include multiple MX records with different priority levels, ensuring reliability and redundancy for email delivery.
Once you’ve entered all the necessary A and MX records, your template should resemble a structure similar to this (placeholder values shown for illustration, remember to use your actual IP and Mailbox Park MX records):
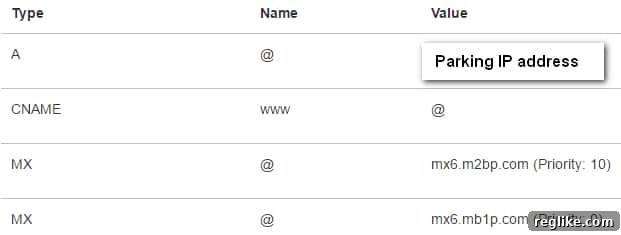
Save your template with a descriptive name, such as “MailboxPark_Template,” to easily identify it later.
Step 3: Temporarily Aligning Your Nameservers with GoDaddy’s Defaults
For your newly created DNS template to be effectively applied to your domains, those domains must first be using GoDaddy’s default nameservers. If your domains are currently pointing to a third-party parking company’s nameservers, you need to change them to GoDaddy’s standard nameservers. This is a temporary measure, but a necessary one to allow GoDaddy’s DNS management system to take full control and apply your custom template.
While your domains are pointing to GoDaddy’s default nameservers, their web traffic will temporarily resolve to GoDaddy’s holding pages. However, since we’re using the A record in your DNS template to point to your original parking IP, this temporary phase should be very brief and ideally have minimal impact on your web presence once the template propagates. The key is to execute Step 4 immediately after this step.
To change nameservers in bulk:
- Navigate back to your Domain Manager in GoDaddy.
- Select all the domain names to which you intend to apply the Mailbox Park template.
- Look for the “Nameservers” icon or option, typically found in the action bar or dropdown menu.
- Choose the “Standard” option, which instructs GoDaddy to use its default nameservers. Confirm the change.
This bulk operation simplifies the process, saving you from editing each domain individually. Be aware that nameserver changes can take a few minutes to an hour to fully register within GoDaddy’s system before the template can be applied.
Step 4: Deploying Your Custom DNS Template Across Multiple Domains
With your nameservers temporarily updated and your DNS template ready, you can now apply it to your selected domains. This is the step where GoDaddy’s bulk management capabilities truly shine, allowing you to quickly propagate your Mailbox Park email settings.
Return to the “DNS Templates” section within your GoDaddy Domain Manager. Locate the template you created earlier (e.g., “MailboxPark_Template”). You’ll typically see an icon next to your template that allows you to apply it to domains.

Click on the “Apply” icon associated with your template. You will be prompted to enter a list of domain names. Copy and paste your list of domains into the provided field. Double-check your list for accuracy, then submit the request. GoDaddy will then proceed to apply the DNS template, including your custom A record and the Mailbox Park MX records, to all the specified domains.
After applying the template, DNS changes need time to propagate across the internet. This process, known as DNS propagation, can take anywhere from a few minutes to up to 48 hours, although it often completes much faster for A and MX records. During this period, some users might still see old DNS records, but eventually, the new settings will take effect globally.
To verify that your MX records have been correctly updated and are pointing to Mailbox Park, you can use an online DNS lookup tool. A highly recommended tool for this purpose is 250ok’s DNS Lookup. Simply enter one of your domain names, and it will display its current MX records. Confirm that these match the Mailbox Park records you configured in your template.
Step 5: Finalizing Your Domains Within Mailbox Park
While configuring your DNS records with GoDaddy is essential, it’s only half the battle. The final, critical step is to officially add these domains to your Mailbox Park account. This ensures that Mailbox Park is aware of which domains to monitor for email traffic and for which to credit your account with earnings.
Log in to your Mailbox Park account. Their interface typically includes a section where you can add new domains. Follow their specific instructions to input your domain names. This step is usually straightforward and involves a simple submission process. Once added, Mailbox Park will begin processing emails received for these domains and calculating your earnings based on their monetization model.
Important Considerations and Potential Hurdles
While the process outlined above is designed for efficiency, domain management can sometimes present unique challenges. Awareness of these can help you troubleshoot and plan effectively:
- Varying Parking Company Setups: Your current domain parking company might not always use a single, consistent IP address for all your parked domains. Some might employ multiple IPs, or even change them periodically. If your domains resolve to different IPs, you might need to create multiple A records or even multiple DNS templates to accommodate these variations. Always verify the IP address for each batch of domains you’re migrating.
- A Record Support Limitations: Not all domain parking companies fully support pointing web traffic via an A record while maintaining their parking page functionality. Some rely exclusively on nameservers for their system to work correctly. In such rare cases, you might face limitations or need to explore alternative web parking solutions that are more A record-friendly.
- DNS Propagation Delays: DNS changes, especially nameserver updates, are not instantaneous. It can take time for these changes to propagate across the global network of DNS servers. While the steps are designed to minimize web traffic disruption, be prepared for potential short periods where your domain’s web presence might be affected. Patience is key during this propagation phase.
- Verification and Troubleshooting: Regularly use DNS lookup tools to verify your MX records are correctly pointing to Mailbox Park. If you encounter issues, double-check your IP address, the exact Mailbox Park MX records, and ensure your GoDaddy nameservers are set to “Standard” before applying the template. Allow ample time for propagation before concluding that a setup error exists.
- Email Content and Privacy: Be mindful that by directing your email to a third-party service like Mailbox Park, you are allowing them to process and analyze the incoming email content for monetization purposes. Understand their privacy policy and terms of service regarding email content handling.
Maximizing Your Mailbox Park Earnings
Once your domains are successfully integrated with Mailbox Park, you can further optimize your earnings. Consider which of your domains are more likely to receive commercial email. Generic, descriptive, or industry-specific domain names often attract more relevant commercial inquiries than highly niche or personal domains. Periodically review your Mailbox Park account to see which domains are performing best and consider adding more domains that fit similar profiles. The beauty of this system is that it’s largely passive once set up, allowing you to focus on growing your domain portfolio while your email traffic generates income.
Conclusion: Unlock the Full Potential of Your Domain Portfolio
Monetizing your domain’s email traffic through Mailbox Park represents a smart, forward-thinking strategy for domain owners. By leveraging GoDaddy’s efficient DNS Templates, what could otherwise be a complex and time-consuming task for multiple domains becomes a streamlined, five-minute operation. You no longer need to let potential income from email sit idle; instead, you can actively tap into this valuable resource. Follow this guide to seamlessly integrate your domains with Mailbox Park, unlock a new stream of passive income, and gain deeper insights into the activity your domain portfolio generates. Start maximizing the full potential of your domains today!